Free Pattern
Step-by-Step
Crochet
Small AccessoriesSage and terracotta boho butterfly charm crochet pattern
A cotton bobble charm with a stuffed bow loop and tapered ribbon tails, finished as jewelry.
- Level
- Intermediate
- Time
- 4-6 hours
- Hook
- 2.5 mm
- Yarn
- Sport/DK
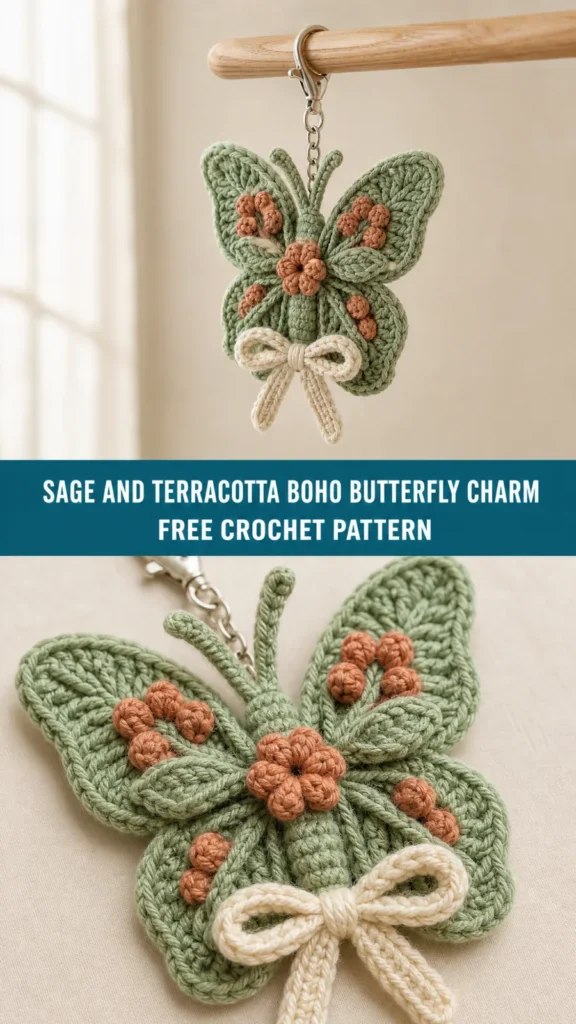
Pattern highlights
- Work the bobble sprig first, finishing with slip stitches and weaving in the ends.
- Crochet two to four sage leaves separately, starting from a simple chain base.
- Make two bow loop pieces worked in the round, stuffing each lightly before closing.
- Flatten each stuffed loop into a rounded bow shape once the opening is closed.
- Crochet two ribbon tails flat, decreasing at both edges of the last few rows to taper them.
- Sew the sprig, leaves, bow loops, and ribbon tails together into one charm.
- Attach the lobster clasp, jump rings, and chain links to finish it as a charm.
About This Pattern
I keep a shelf for the small stuff — the pieces too tiny to be a project but too fussy to call scrap work. This charm belongs there. It is jewelry-scale crochet, worked in cotton fine enough to show every stitch, and it asks for patience rather than yardage. Notebook entries like this one earn their space by teaching a technique in miniature.
The construction mixes three approaches in one small piece. A bobble sprig gives texture up top, a sage leaf pattern grows from a simple chain, and the bow is built two ways — one part worked in the round and lightly stuffed, the other worked flat with decreases at both edges to taper it. That contrast is the whole appeal.
What comes off the hook is a small dimensional charm, not a wearable garment. It reads as a bow with a bobbled sprig and a leaf, sized for a clasp and a length of chain. Once assembled with the jump rings, it is ready to hang rather than wear directly.
Worth knowing
I like a project where every part has a different job. The bobbles pop outward and need coaxing to face one way, which is oddly satisfying to fuss over. The bow loops are worked in the round and lightly stuffed, so they hold real volume, while the ribbon tails are flat and tapered by decreasing at both ends of each row — a nice contrast in technique for so little yarn. The leaf pattern is its own small aside, built from a plain chain into something with shape. None of it takes long. All of it rewards a tighter gauge, since the smaller hook keeps the fabric close enough that the stuffing stays hidden and the bobbles keep their definition.
Common mistakes
- Bobbles facing different directions Push each bobble outward as you crochet it so they all lean the same way. Fluff any flat ones with your fingers once the sprig is done.
- Overstuffing the bow loops Add fiberfill lightly during the stuffing round, not after. Too much fill will show through the fabric at this gauge.
- Using a hook that's too large Stick to the 2.5mm or 3.0mm range even if it feels tight for the yarn weight. The denser fabric is what keeps stuffing from peeking through.
- Uneven taper on the ribbon tails Decrease at both ends of every row in that section, not just one. Skipping a side will pull the tail crooked.
- Skipping the sewing tail on the ribbon rows Leave a length of yarn when fastening off the tail piece instead of cutting it short. You'll need it to sew the tail onto the bow.


Intermediate
Progress Tracker
0 of 0 rounds
Tap a round to tick it off — your place is saved on this device.
The kit
Yarn
- Light purple or lavender yarn, approximately 15 yards (sport weight or DK weight)
- Sage green yarn, approximately 10 yards (sport weight or DK weight)
- Cream or off-white yarn, approximately 12 yards (sport weight or DK weight)
- A smooth cotton or cotton blend yarn works beautifully for this project. The stitch definition in the close-up image suggests a mercerized cotton or similar yarn that shows texture clearly.
Hook
- 2.5mm or 3.0mm crochet hook (US size B-1 to D-3)
- Using a smaller hook than recommended for your yarn weight creates a tighter fabric. This helps the bobbles hold their shape and prevents stuffing from showing through.
Notions
- Lobster claw clasp, approximately 1.5 inches
- Small chain links, approximately 2 to 3 inches total length
- Jump rings (4 to 6 small rings)
- Tapestry needle
- Small amount of polyester fiberfill for the bow center
- Scissors
- Stitch marker (optional but helpful)
Top of Sprig
After your final bobble, sl st in the next 2 sts. FO and weave in ends.
Shaping Tips for the Bobbles
Your bobbles will naturally want to pop to one side. Encourage them all to face the same direction by gently pushing each one outward as you work. If some bobbles look flat, you can fluff them up with your fingers after finishing.
Crochet Leaf Pattern (Make 2 to 4)
Using sage green yarn: Ch 8.
Round 1Starting in 2nd ch from hook: sl st, sc, hdc, dc, hdc, sc, sl st. (7 sts)
Round 2Ch 1, turn. Working back along the opposite side of your foundation chain: sl st, sc, hdc, dc, hdc, sc, sl st. (7 sts)Sl st to join at the base. FO, leaving a 6-inch tail for attaching to the stem.
The leaf should have a pointed oval shape with a slight curve. Make 2 to 4 leaves depending on how full you want your keychain to look.
Crochet Bow Pattern The bow consists of two pieces: the bow loops and the center wrap.
Bow Loops (Make 2)
Using cream yarn: Ch 6, sl st to form a ring.
Part 5
Round 1Ch 1, work 10 sc into the ring. Sl st to join. (10 sc)
Round 2Ch 1, sc in each st around. Sl st to join. (10 sc)
Rounds 3–6Repeat Round 2. (10 sc)
Round 7Sc in each st around, stuffing very lightly with fiberfill as you work. Sl st to join. (10 sc)
Round 8Dec around until opening closes. FO. (5 sts, then close) Flatten the tube shape so it forms a rounded bow loop. Make a second identical piece.
Bow Tails (Make 2)
Using cream yarn: Ch 12.
Part 6
Round 1Starting in 2nd ch from hook, sc in each ch across. (11 sc)
Rounds 2–4Ch 1, turn, sc in each st across. (11 sc)
Round 5Ch 1, turn, dec, sc to last 2 sts, dec. (9 sc)
Round 6Ch 1, turn, dec, sc to last 2 sts, dec. (7 sc)
Round 7Ch 1, turn, dec, sc to last 2 sts, dec. (5 sc) FO, leaving a tail for sewing. This creates a tapered ribbon tail. Make two for the complete bow.Center Wrap Using cream yarn: Ch 5.
Part 7
Round 1Starting in 2nd ch from hook, sc in each ch. (4 sc)
Rounds 2–6Ch 1, turn, sc in each st. (4 sc) FO, leaving a long tail. Assembling the Bow 1. Stack the two bow loops side by side, pinching them together in the center.2. Position the two tails behind the loops, angling them downward in a V shape.
3. Wrap the center piece around all layers at the pinched point.
4. Use the yarn tail to sew the wrap securely in place.
5. Adjust the loops and tails until the bow looks balanced.
Assembly Instructions Now comes the fun part. Putting everything together is like assembling a tiny bouquet.
Preparing the Hardware 1. Attach your lobster claw clasp to one end of the chain using a jump ring.
2. At the other end of the chain, attach another jump ring. This is where you will connect your crochet pieces.
Attaching the Lavender Sprigs 1. Thread a tapestry needle with matching green yarn.
2. Sew the top of each lavender stem to a jump ring, wrapping the yarn several times for security.
3. Position the two sprigs so they hang at slightly different lengths for visual interest.
4. Add the leaves by sewing them to the stems near the top, just below where the bobbles begin.
Attaching the Bow 1. Using a jump ring, attach the bow to the bottom of the chain.
2. Alternatively, you can sew the bow directly to the chain using cream yarn.
3. Make sure the bow hangs with the tails pointing downward.
Final Adjustments Fluff the bobbles gently to make them round and full.
Notions
Lobster claw clasp, approximately 1.5 inches Small chain links, approximately 2 to 3 inches total length Jump rings (4 to 6 small rings)
Tapestry needle Small amount of polyester fiberfill for the bow center Scissors Stitch marker (optional but helpful)
Abbreviations and Stitch Definitions ch = chain: Yarn over, pull through the loop on your hook.
sl st = slip stitch: Insert hook, yarn over, pull through both the stitch and the loop on your hook in one motion.
sc = single crochet: Insert hook into stitch, yarn over and pull up a loop (2 loops on hook), yarn over and pull through both loops.
inc = increase: Work 2 single crochet stitches into the same stitch. This adds one stitch to your count.
dec = decrease (invisible decrease): Insert hook through the front loops only of the next 2 stitches, yarn over and pull through both front loops, yarn over and pull through both loops on hook.
bob = bobble stitch: Yarn over, insert hook into stitch, yarn over and pull up a loop, yarn over and pull through 2 loops. Repeat this sequence 4 more times in the same stitch (6 loops on hook). Yarn over and pull through all 6 loops. Some crocheters like to add a chain 1 to secure the bobble.
FO = fasten off: Cut yarn, pull the tail through the last loop, and tighten.
Gauge
Gauge is not critical for this project since it is decorative. However, your stitches should be tight enough that no gaps appear between them. If your fabric looks loose or holey, go down a hook size.
Pattern Notes
All pieces are worked in continuous rounds unless otherwise noted. Do not join at the end of each round.
Use a stitch marker to track the beginning of each round.
The lavender sprig consists of bobbles worked along a central stem.
You will make two lavender sprigs for the complete keychain as shown in the photos.
Weave in ends as you go to minimize finishing work.
Crochet Lavender Sprig Pattern (Make 2)
The Stem Base Using sage green yarn: Row 1: Ch 25. (25 ch)
Round 2Starting in the 2nd ch from hook, sc in each ch across. (24 sc) Do not fasten off. You will continue working the bobbles directly onto this stem.
Working the Bobbles
Starting about 3 chains up from the bottom of your stem, join purple yarn with a slip stitch.
Bobble Row: Sl st in next st, bob in next st, sl st in next st.
Skip 1 st, bob in next st, sl st in next st.
Continue this pattern up the stem, making approximately 8 to 10 bobbles per sprig.
The bobbles should cluster more densely at the top of the sprig and become slightly more spaced toward the bottom. This mimics how real lavender blooms.
Finishing
- Weave in ends on the bobble sprig as soon as it is fastened off, before it gets buried under other pieces.
- Stuff each bow loop lightly as you work the round that calls for fiberfill, then close the decrease round and flatten the shape by hand.
- Sew the sprig, leaves, bow loops, and ribbon tails together, then attach the jump rings, chain, and lobster clasp last.
Why it works
The bow loops start with ten single crochet into a ring, hold that count for several rounds, then decrease down to close the tube — the decrease is what lets the piece flatten into a loop instead of staying a tube.
The ribbon tails are worked flat in rows rather than in the round, with decreases at both ends of the last rows, which is what produces the tapered point at the tip.
The sprig ends in a slip stitch join before fastening off, separating it cleanly from the leaf pattern, which starts fresh from its own chain rather than continuing off the sprig.
What it becomes
- Hang it from a chain as a pendant charm, paired with the sage and cream palette already in the piece.
- Clip it to a bag zipper as a small accent, since the lobster clasp is already built in.
- Attach it to a keyring with an extra jump ring for a compact, gift-scale accessory.
Original pattern: https://crochetwithmia.com/sage-and-terracotta-boho-butterfly-charm-free-crochet-pattern/
FAQ
What yarn works best for this charm?
A smooth cotton or cotton blend at sport or DK weight, since it shows the bobble and stitch texture clearly. Mercerized cotton is a good match if you have it on hand.
Do I really need to stuff the bow loops?
Yes, the pattern calls for stuffing lightly as you work the round before closing. It gives the loop enough shape to flatten into a proper bow rather than lying flat.
How many leaves should I make?
The pattern gives a range of two to four leaves, so it's your call based on how full you want the sprig to look. I'd start with two and add more if there's room.
Why does the hook size matter so much here?
Using the smaller 2.5mm to 3.0mm range instead of a standard hook for this yarn weight tightens the fabric. That keeps the bobbles defined and stops the fiberfill from showing through the stitches.