
Free Pattern
Step-by-Step
Crochet
AmigurumiSad Bear Amigurumi Crochet Pattern – Droopy, Charming & Fun to Make
Crochet an adorably droopy Sad Bear amigurumi with velour yarn, a plush snout, floppy ears, and a cozy fabric snood. A charming handmade gift idea.
Level IntermediateTime 4-6 HoursHook 2.5 mmYarn Worsted
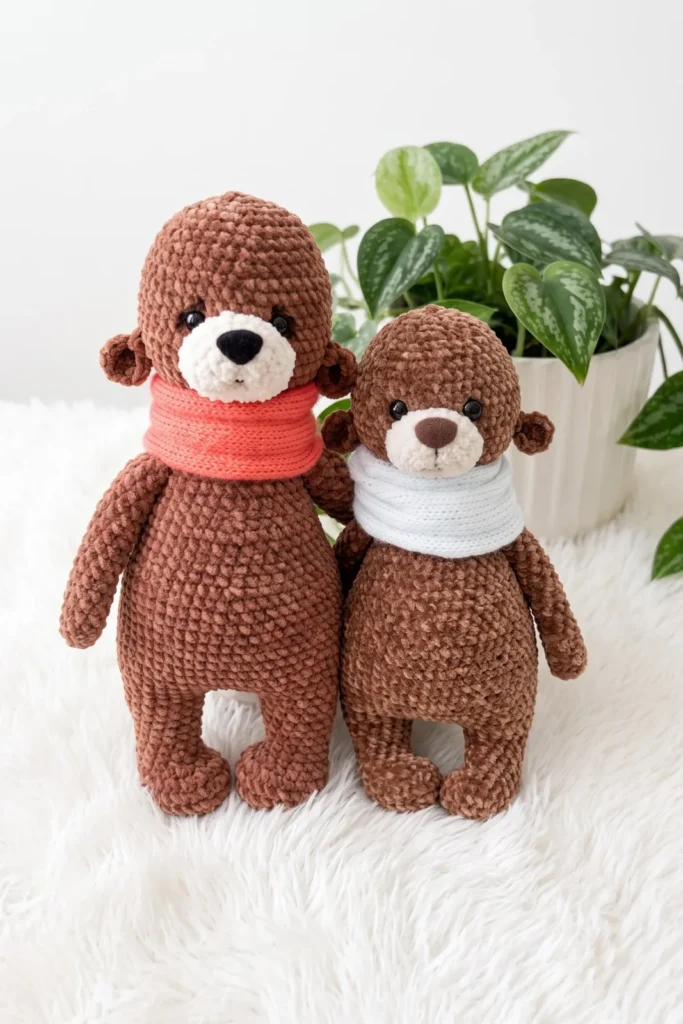
Pattern highlights
- Crochet both arms separately in a continuous spiral, then set them aside to attach later during body shaping.
- Begin the body at the first leg, working it in continuous rounds while a stitch marker tracks the start of each round.
- Complete the second leg the same way, then join both legs to continue seamlessly into the lower body rounds.
- Shape the lower body with gradual increases and decreases before transitioning smoothly into the taller upper body and head.
- Pause partway through the head shaping to insert the safety eyes so they're securely anchored from the inside.
- Crochet the snout separately in its own short rounds, then whip stitch it snugly onto the front of the head.
- Make two ears, stuff and shape them softly so they droop naturally, then sew them onto the head at an angle.
- Sew on the arms, stuff every piece firmly, close all openings, add blush shading, and tie on the fabric snood to finish.
About This Pattern
This Sad Bear amigurumi is the plush toy equivalent of a warm hug for a rainy day — a droopy-eared, soft-bodied bear with an expression that's somehow both melancholy and irresistibly huggable. Worked in velvety velour yarn, this little guy has a distinctive charm that sets him apart from typical wide-eyed amigurumi animals. He's perfect for crocheters who love character toys with personality, or anyone hunting for a gift that feels a little more emotionally honest than your average smiling teddy bear.
You'll work the body and head as one continuous piece starting from the legs, moving into a shaped upper body, then adding a separately crocheted snout, two floppy ears, and a pair of arms attached during shaping. Expect to use magic rings, single crochet increases and decreases, and careful stitch marker placement to track your continuous spiral. This is a great project for confident beginners ready to level up, or intermediate crocheters looking for a satisfying, detail-rich weekend make — plan on 4 to 6 hours total.
The finished bear is a soft, plush little companion with a rounded, well-stuffed body, gently sagging ears, and a tender, downturned snout that gives him his signature sad-but-sweet look. Finished off with a fabric snood tied around his neck and blushed cheeks for extra warmth, he's cuddly enough for a child's shelf and charming enough for an adult collector. He makes a wonderfully unique handmade gift for birthdays, baby showers, or just because someone needs a small soft thing to hold.
Variations
The Sad Bear is incredibly easy to customize once you've got the base pattern down. For color, try a classic honey-brown or oatmeal velour for a traditional teddy look, or go bold with dusty lavender, sage green, or blush pink for a more whimsical, gender-neutral nursery vibe — Alize Softy and Ice Velour both come in gorgeous muted tones that suit this droopy-eared design. If you want a two-tone bear, work the snout and inner ears in a contrasting cream or tan velour while keeping the body in your main color for a classic panda-bear-adjacent look. For yarn substitutions, any plush low-pile yarn works beautifully here — Bernat Baby Velvet, Comfy Cotton, or even a soft chenille will give similar squishy results, just double check your gauge with a C-2/2.5mm hook since plush yarns vary in thickness. To make a mini version, work the same shaping sequence with a lighter weight yarn (like DK) and a smaller hook, which will naturally shrink the finished bear to a palm-sized companion perfect for keychains or ornaments. For a jumbo cuddle-buddy, size up to a bulky chenille yarn with a larger hook, adding a few extra stitches per round in the body rounds to keep proportions balanced. Seasonally, swap the fabric snood for a tiny knit-look scarf print in autumn plaid, or tie on a length of ribbon instead of fabric for a quicker, no-sew finish. You could also embroider a little heart or star on his chest, or give him a tiny fabric patch on one ear for extra storytelling charm. However you style him, the droopy sad-bear silhouette stays the star of the show.
I adore this pattern because the Sad Bear has real personality — that gently drooping snout and those floppy ears make him feel like a little character rather than just another round-eyed amigurumi. Working the body and head as one continuous spiral piece, starting from the legs and shaping all the way up, is deeply satisfying once you get your stitch marker rhythm going; there's no seaming the torso together, which means fewer ends to weave in later. I love how the velour yarn makes every stitch feel plush and forgiving, hiding minor tension inconsistencies while giving the finished bear an irresistibly soft, huggable texture. The separately worked snout and ears add just enough sculptural detail to make him feel dimensional without turning this into a marathon project. And that little fabric snood tied at his neck? It's such a simple addition, but it instantly makes him feel finished, cozy, and gift-ready. This is the kind of pattern where each part builds anticipation for assembly day, when all those separate pieces finally come together into one adorably droopy little bear.
Common mistakes
- Losing track of the round start in
- Place a stitch marker in the very first stitch of round one and move it up into the first stitch of every new round without exception — never skip this step, even on rounds that feel repetitive.
- Overstuffing or understuffing the body
- Stuff firmly but in small pieces as you go, especially before closing the head, pressing fiberfill into the snout and ear base areas so the shape stays rounded rather than lumpy.
- Attaching the arms in the wrong
- Pin the arms in place with stitch markers before sewing and check they sit symmetrically on both sides of the upper body, adjusting placement before you commit to permanent stitches.
- Working the snout too tightly
- Match your snout tension to your body tension by using the same hook size throughout, and ease the snout gently into place with pins before whip stitching it around the entire edge.
- Cutting the fabric strip for the snood
- Cut your 5cm x 40cm fabric strip with a small seam allowance and either hem the edges with needle and thread or use a fabric with a tight weave that resists fraying.
- Skipping gauge and hook size checks
- Always test a small swatch with your chosen yarn and hook first; if stitches look loose or holes are visible, drop down a hook size, especially important for velour yarns which vary by brand.


Intermediate
Progress Tracker
0 of 0 rounds
Tap a round to tick it off — your place is saved on this device.
Materials
Yarn
- Velour-weight yarn (such as Ice Velour, 300 m / 100 g) or any soft, plush yarn like Alize Softy — choose your preferred bear color
Hook size
- Size appropriate to your yarn (typically C-2 / 2.5 mm for velour/soft yarns — check your yarn label)
Safety eyes
- 5 mm, quantity 2
Stuffing
- Polyester fiberfill
Stitch markers
- At least 2
- Yarn needle / tapestry needle
- Scissors
Velour fabric strip
- 5 cm × 40 cm (for the snood / neck scarf)
- Needle and thread (for sewing the fabric snood seam)
- Blush or chalk pastel (for shading/tinting the face dimples)
Arms (Make 2)
- Round 1Start with a foundation chain of 2 ch, then work 8 sc into the second chain from the hook. (8)
- Round 2-19Sc in each st around. (8)Stuff the arm lightly. Flatten the open end so the edges meet, then crochet through both layers — working 4 sc across — to close the arm.
First Leg
- Round 1Ch 5. Starting in the second ch from the hook: 3 sc, 3 sc in the last ch (corner), 2 sc along the other side of the chain, inc in the final st. (10)
- Round 2Inc, 2 sc, inc 3 times, 2 sc, inc 2 times. (16)
- Round 31 sc, inc, 2 sc, 1 sc, inc repeat 3 times, 2 sc, 1 sc, inc repeat 2 times. (22)
- Round 4Sc in each st around. (22)
- Round 55 sc, dec 6 times, 5 sc. (16)
- Round 65 sc, dec 3 times, 5 sc. (13)
- Round 7-9Sc in each st around. (13)
- Round 106 sc, inc, 6 sc. (14)
- Round 11Sc in each st around. (14)
- Round 126 sc, inc repeat 2 times. (16)
- Round 13Sc in each st around. (16)Cut yarn and fasten off. Set aside.
Second Leg
Work Rnds 1–13 exactly as for the First Leg. Do not cut yarn.
Joining the Legs
Work 8 sc along the second leg, then chain 5. Join to the first leg so that the toes of both legs face toward each other (pigeon-toed). Continue around.
- Round 1416 sc around the first leg, 5 sc along the chain bridge, 16 sc around the second leg, 5 sc along the other side of the chain bridge. (42)
- Round 15Sc 40 sts, then place a stitch marker here — this point is now the new beginning of the round (center back). (42)
Lower Body
- Round 166 sc, inc repeat 6 times. (48)
- Round 17Sc in each st around. (48)
- Round 187 sc, inc repeat 6 times. (54)
- Round 19-20Sc in each st around. (54)
- Round 21Sc 54 sts around, then ch 4 and work 3 sc back along those chains. This forms the small tail.
- Round 22-26Sc in each st around. (54)
Upper Body
- Round 277 sc, dec repeat 6 times. (48)
- Round 28Sc in each st around. (48)
- Round 291 sc, dec repeat 3 times, 30 sc, dec, 1 sc repeat 3 times. (42)
- Round 30-32Sc in each st around. (42)
- Round 335 sc, dec repeat 6 times. (36)
- Round 34-36Sc in each st around. (36)
- Round 374 sc, dec repeat 6 times. (30)
- Round 38Sc in each st around. (30)Continue stuffing as you work.
- Round 396 sc, then work 4 sc joining the next 4 body sts together with the 4 closing sts of the first arm, 10 sc, then work 4 sc joining the next 4 body sts together with the 4 closing sts of the second arm, 6 sc. (30)
- Round 40Sc in each st around. (30)
- Round 413 sc, dec repeat 6 times. (24)
- Round 422 sc, dec repeat 6 times. (18)
- Round 43-44Sc in each st around. (18)
Head
- Round 452 sc, inc repeat 6 times. (24)
- Round 463 sc, inc repeat 6 times. (30)
- Round 474 sc, inc repeat 6 times. (36)
- Round 485 sc, inc repeat 6 times. (42)
- Round 496 sc, inc repeat 6 times. (48)
- Round 50-55Sc in each st around. (48)Install the 5 mm safety eyes at Round 52 or 53 before continuing.
- Round 566 sc, dec repeat 6 times. (42)
- Round 57Sc in each st around. (42)
- Round 585 sc, dec repeat 6 times. (36)
- Round 59Sc in each st around. (36)
- Round 604 sc, dec repeat 6 times. (30)
- Round 61Sc in each st around. (30)
- Round 623 sc, dec repeat 6 times. (24)
- Round 632 sc, dec repeat 6 times. (18)
- Round 641 sc, dec repeat 6 times. (12)Continue working decreases until the opening is fully closed. Fasten off and weave in the end.
Snout
- Round 1Start with a foundation chain of 2 ch, then work 6 sc into the second chain from the hook. (6)
- Round 2Inc in each st around. (12)
- Round 31 sc, inc repeat 6 times. (18)
- Round 4-5Sc in each st around. (18)
Do not stuff. Leave a long yarn tail for sewing.
Ears (Make 2)
- Round 1Start with a foundation chain of 2 ch, then work 6 sc into the second chain from the hook. (6)
- Round 2Inc in each st around. (12)Flatten the ear so both edges meet. Working through both layers, join with 1 sc across to close. Leave a long yarn tail for sewing.
Assembly
- Step 1Dimple tucks: Thread a yarn needle with a length of yarn. Insert the needle at point 1 (a dimple location on the face) and bring it out at point 2. Insert at point 3 and bring back out at point 1. Pull gently to create the first dimple, tie a secure knot — do not cut the yarn yet. Insert again at point 1, bring out at point 4, insert at point 5, and return through point 1. Pull to form the second dimple, tie a knot, then cut the yarn and bury both ends inside the head.
- Step 2Shading: Use blush or chalk pastel to lightly tint the dimple areas and give the bear his sorrowful expression.
- Step 3Safety eyes: If not already installed, set the 5 mm safety eyes at Round 52 or 53, positioning them on either side of where the snout will sit.
- Step 4Snout: Pin the snout to the head, centered between Rounds 48 and 53. Sew around the entire edge using a whipstitch, leaving a small gap to add a tiny amount of stuffing before closing completely.
- Step 5Ears: Sew one ear on each side of the head at approximately Round 49 or 50, angling them slightly downward to complement the sad expression.
- Step 6Snood: Fold the 5 cm × 40 cm velour fabric strip in half lengthwise. Sew the long edge closed to form a tube. Wrap around the bear’s neck and adjust to sit naturally.
- Step 7Finishing: Weave in all remaining yarn ends.
Important notes
💡 Use a C-2/2.5mm hook as a starting point for velour or soft plush yarns, but always check your specific yarn label since plush yarns vary significantly in thickness between brands.
💡 Keep your stitch marker moving diligently through every single round of the continuous spiral body and head — this is the single most important habit for keeping your bear symmetrical.
💡 Stuff in small handfuls rather than one big chunk at the end, working fiberfill into the legs, snout, and ears especially, since these smaller shapes need firm even stuffing to hold their form.
💡 When attaching the 5mm safety eyes, insert them before you finish stuffing the head completely, so you can still reach inside to secure the washers firmly against the fabric.
💡 Use blush or chalk pastel very lightly on the cheeks and dimple areas — a little goes a long way, and you can always add more, but it's hard to remove excess pigment from velour.
💡 Sew the fabric snood seam with a simple whip stitch or backstitch using thread that matches your fabric, and tie it loosely around the neck so it drapes rather than compresses the head-to-body join.
💡 Gauge is not critical for this project, but your fabric should be tight enough that stuffing does not show through the stitches.
💡 This sad bear amigurumi pattern is written in US crochet terminology.
💡 Keep your tension tight — velour and soft plush yarns are forgiving but can gap if your tension is too loose; go down a hook size if you can see fiberfill through the stitches, since a dense fabric gives amigurumi their clean, professional finish.
More photos
Original pattern: https://amigurumiarts.com/sad-bear-amigurumi-crochet-pattern/
FAQ
What yarn weight works best for this Sad Bear pattern?
This pattern is designed for velour-weight yarn like Ice Velour or Alize Softy, which gives the bear its signature plush, huggable texture. If you substitute a different weight, adjust your hook size accordingly and swatch first to keep the finished size consistent.
How much fiberfill will I need for the whole bear?
You'll want a generous supply of polyester fiberfill since the body, head, snout, ears, and arms are all stuffed pieces. It's better to have more on hand than you think you need, since firm, even stuffing is key to the bear holding his shape.
Can I make this bear without the fabric snood?
Absolutely — the snood is a lovely finishing touch but entirely optional. If you skip it, you can tie a simple crocheted or ribbon scarf around the neck instead, or leave him without any neckwear for a cleaner classic bear look.
Is this pattern beginner-friendly or better for intermediate crocheters?
This pattern is best suited for confident beginners or intermediate crocheters comfortable with magic rings, increases, decreases, and continuous spiral rounds. If you've completed a basic amigurumi before, you'll be well prepared for the shaping and assembly steps here.