Free Pattern
Step-by-Step
Crochet
Home DecorShield star coaster: a quick crochet pattern
A five-point star coaster in red, white, and blue cotton, ready in an evening.
- Level
- Intermediate
- Time
- 1-2 hours
- Hook
- 2 mm
- Yarn
- Lightweight
Pattern highlights
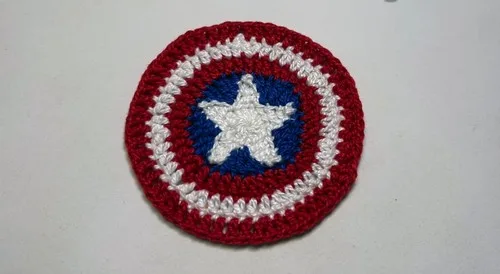
- Begin with a magic ring and work half double crochet stitches into it to form the base circle.
- Close the round with a slip stitch so the center pulls tight without a visible gap.
- Chain out from the joined round to start shaping the first point of the star.
- Work single, half double, and double crochet along that chain so the point tapers outward.
- Skip a couple of stitches around the circle and slip stitch in to anchor the point.
- Repeat the chain-and-stitch sequence around the circle until all the star points are complete.
- Fasten off, weave in the ends, and block the piece flat before using it.
About This Pattern
This little star coaster sits comfortably among my quick single-motif projects—the kind I keep in a basket for slow afternoons. It's the sort of make that fills a gap between bigger pieces, using scraps of red, white, and blue cotton without demanding a whole skein. I like having a few of these ready when a coffee table needs personality or a friend needs a small, cheerful gift. It's not a blanket square, not a granny motif—just a single, satisfying shape that stands on its own.
The build starts with a magic ring, a technique I reach for whenever I want a tidy, gap-free center. From there, fourteen half double crochets fill the ring before a slip stitch closes the round. The real character comes from the star points: each one grows from a chain of four, rising through single, half double, and double crochet before a skip and a slip stitch locks it in place. Repeating that sequence around the circle is what gives the piece its shape.
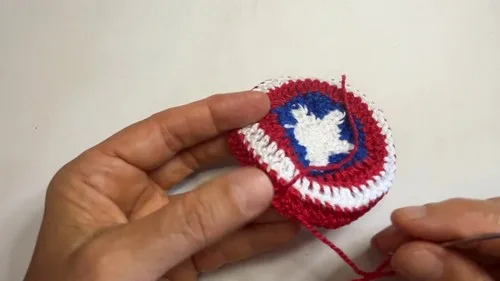
Finished, it's a small star in red, white, and blue cotton—flat enough to sit under a mug, bold enough to catch the eye. The five points give it presence without much yarn, and the tight magic ring keeps the center from puckering. It reads instantly as a nod to a familiar shield, but it works fine as just a star, too. I've set mine on a bookshelf as often as under a cup.
Worth knowing
What I like about this piece is how much shape you get from so few rounds. The magic ring gives a flat, closed center—no hole to fuss over later. Building the star points one chain at a time keeps you paying attention; skip the wrong stitch and the point sits crooked, so there's a small, satisfying precision to it. Working sc, hdc, and dc in sequence along each point chain is a neat little lesson in how stitch height controls shape—short at the base, taller as the point rises. It's fast enough to finish in an evening, but the color choices do real work, turning a plain star into something recognizable. A good project for practicing tension on small pieces.
Common mistakes
- Loose magic ring center Give the ring a firm tug before working the first round so no hole shows once it's pulled closed.
- Miscounting the base hdc Count all fourteen half double crochets before joining, or the points won't land evenly around the circle.
- Mixed-up point stitch order Keep the single, half double, and double crochet in that exact order along each chain, or the taper looks uneven.
- Skipping the wrong stitch count Skip exactly two stitches before the slip stitch join, since skipping more or fewer throws off the point spacing.
- Skipping the blocking step Cotton motifs curl at the edges if you skip blocking; a quick mist and flat dry keeps the star lying true.

Intermediate
Progress Tracker
0 of 0 rounds
Tap a round to tick it off — your place is saved on this device.
The kit
- 100% cotton lightweight yarn in red, white, and blue
- 2 mm crochet hook
- Tapestry needle
- Scissors
Star (Center Of Shield)
Round 1Start with a magic ring. Chain (ch) 2 (counts as 1 half-double crochet [hdc]). Make 14 hdc into the ring.Slip stitch (sl st) on top of the chain 2 to join.
Round 2Chain (ch) 4. Single crochet (sc) in the second chain from the hook, 1 half-double crochet (hdc), 1 double crochet (dc). Skip 2 stitches, slip stitch (sl st) in the 3rd. Ch 4 and repeat the sequence 4 more times to create the star points.Weave in the tails.
Once completed, pull the yarn through and cut it.
Round 3Switch to the blue color yarn. Work 1 standing treble between two star points. Work only in the back loop now: 1 dc, 1 hdc, 1 sc.Skip, 1 sc, 1 hdc, 1 dc.1 treble in the center of the next star point space.Repeat this sequence all around.Slip stitch (sl st) on top of the first treble to join.Pull the yarn through and cut it.Weave in the tails.
Round 4Switch to the red color yarn. Work 1 standing double crochet (dc) on top of one of the star points (work through both loops). Make 3 dc, then 2 dc in the same stitch. 4 dc, followed by making 2 dc in the same stitch. Repeat this sequence all around the star. Slip stitch (sl st) to join.Pull the yarn through and cut it.
Round 5Switch back to the white yarn. Work 1 standing double crochet (dc). Make 4 dc. Then make 2 dc in the next stitch.Repeat the sequence (5 dc, 2 dc) all around.Slip stitch (sl st) to join.
Round 6Make 6 dc, then 2 dc in the next stitch. Repeat this sequence all around. Work a seamless stitch to finish the round.
Assembly
Step 1Stretch your work on a foam board and lightly sprinkle with water to block it (optional).
Step 2Let it dry.
From the collection
Finishing
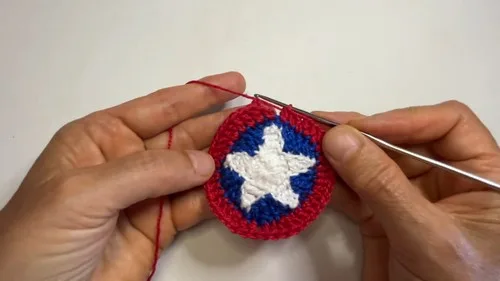
- Weave in the yarn tail securely once the last point is fastened off.
- Pin the star to a foam board and mist it lightly with water to even out the points.
- Let the piece air-dry completely flat before setting it under a mug.
Why it works
The fourteen half double crochets sit inside a single joined round, so the base stays flat rather than domed.
Each star point starts from its own chain-4 rather than continuing directly from the base stitches, which is why the points stand apart instead of blending into the circle.
Working sc, then hdc, then dc along each point's chain builds a gradual taper, since taller stitches naturally widen the point as it rises.
What it becomes
- Set it under a mug on a desk or coffee table as a durable cotton coaster.
- Stitch a loop on the back and hang it as a small wall accent near a shelf of collectibles.
- Give it as a quick handmade gift for a friend who collects superhero memorabilia.
Original pattern: https://crocheteverything.com/cute-crochet-captain-america-shield-coaster-tutorial-for-marvel-lovers/
FAQ
Can I use a different yarn weight than the lightweight cotton listed?
You can, but a thicker yarn will make the star points wider and less crisp. I'd stick close to the lightweight cotton for the cleanest shield-like points.
Why does the pattern use a magic ring instead of a chain-2 loop?
The magic ring pulls fully closed, leaving no center hole once you tighten it. That matters here since the coaster sits flat, right side up, with nothing to hide it.
How many points does the star end up with?
The chain-4 point sequence is worked five times, so you finish with a five-point star reflecting the classic shield look.
Is this coaster sturdy enough for daily use?
Cotton yarn holds up well to spills and washing, so it's a practical coaster, not just decorative. Blocking it flat first helps it sit steady under a mug.