Free Pattern
Step-by-Step
Crochet
AccessoriesSpiked treble granny cowl crochet pattern
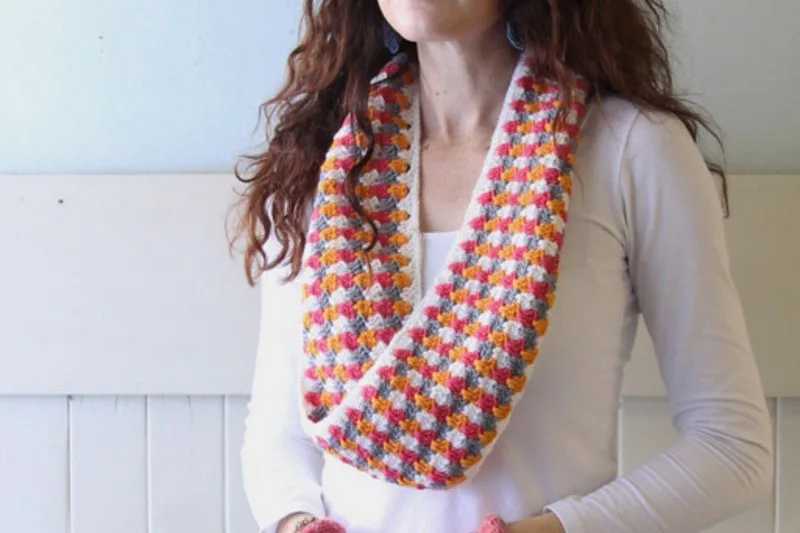
A striped granny cowl built on a spiked treble stitch, worked flat and seamed.
- Level
- Intermediate
- Time
- 4-6 hours
- Hook
- 4 mm
- Yarn
- DK
Pattern highlights
- Chain a long foundation row in Yarn A and work a base row of trebles and chain-1 spaces.
- Work Yarn C, catching the spiked treble from the row below to keep the reach going.
- Add Yarn D, repeating the cluster and chain-1 pattern across the row.
- Finish the color sequence back in Yarn A, cutting a generous tail after each color change.
- Twist the panel once before laying the two short ends side by side.
- Seam the ends together with the leftover tails and a yarn needle to close the loop.
About This Pattern
Every notebook needs a stitch that makes you stop and look twice. This cowl earns its place for the spiked treble alone, a cluster stitch I hadn't logged before. It sits in the granny-stitch family but reaches back a row to grab its color, which is the whole trick.
The technique here is simple in theory and fiddly in the hand. A spiked treble means inserting the hook into a stitch two rows below instead of the one right under your hook. Worked in a three-stitch cluster, it drags a hint of the previous color up through the new one.
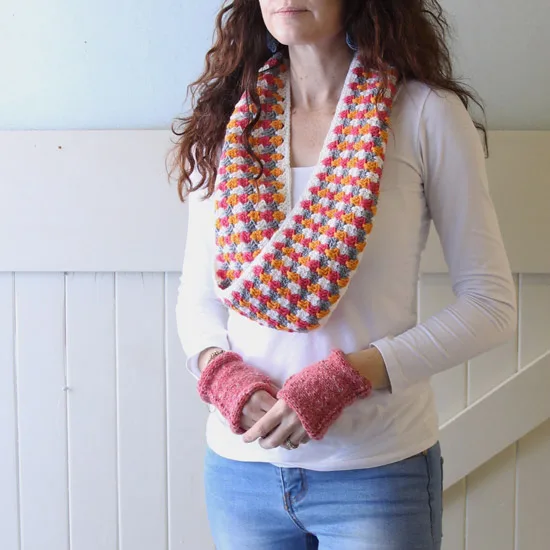
The finished object is a long flat panel, four colors deep, twisted once and seamed into a loop. No shaping, no counting increases. Just a rectangle that becomes a cowl the moment the two short ends meet.
Skill level: Beginner. All stitches are written in UK terms. The finished cowl measures approximately 15cm wide and 105cm around. For a soft, warm feel against the neck, choose a wool yarn such as merino rather than a scratchier fiber.
Common mistakes
- Inserting the spiked treble in the wrong row The spiked stitch reaches two rows below, not one. Check the pattern note before each row to confirm which row you're spiking into.
- Cutting yarn tails too short The pattern calls for generous tails at every color change because they double as the seaming yarn later. Leave more than feels necessary.
- Losing track of chain-1 spaces Every cluster sits in a chain-1 space from the row before. Count spaces, not stitches, when deciding where the next cluster goes.
- Working UK terms as US terms This pattern is written entirely in UK terms, so a UK treble is not a US treble. Keep the terms straight from the first row.
- Forgetting the twist decision before seaming Twisting or not twisting changes which colors line up at the seam. Decide before you thread the needle, not after.
Intermediate
Progress Tracker
0 of 0 rounds
Tap a round to tick it off — your place is saved on this device.
The kit
- Debbie Bliss Rialto DK – Yarn A (White), Yarn B (Petunia), Yarn C (Grey), Yarn D (Tangerine)
- 4mm, 3.5mm crochet hook
- yarn needle
- scissors
Main Pattern
To start, make a slip knot with the Yarn A and use the 4mm hook and ch172 – Foundation ch. Feel free to chain a few extra stitches if you're not sure you've counted correctly. You can always undo them at the end. If you'd like your cowl longer or shorter, alter your number of chains in the foundation row and stick to multiples of 4.
Row 1tr into the 4 th ch from the hook, tr into the next st (counts as 3tr). * Ch1, skip a ch and work 1tr into the next 3 ch, ch1. Repeat from * until you reach the end of the row.
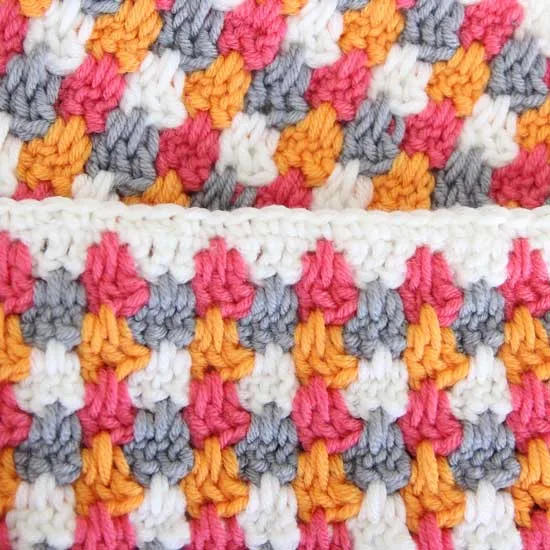
Step by step for the spiked treble (spk tr) cluster: First – yarn over as usual, then insert the hook into the base of the stitch from the previous row (not the stitch directly below the hook), and complete the treble as normal. Second – yarn over, insert the hook into the base of the stitch two rows below the row you are working on, and complete the treble as normal; this middle stitch is the spiked treble. Third – repeat the first stitch again into the same space to complete the 3-stitch cluster. In other words, the first and third trebles are worked into the top of the stitch as usual, while only the middle stitch reaches down into the row below.
Row 2Attach Yarn B and cut Yarn A, leaving a generous tail (You will be using the tail to attach one end to the other to form a cowl). Ch4 (counts as 1tr, ch1) and then work (tr, spk tr, tr) into the next ch-1 sp: t0 create the spiked treble, the middle tr is worked into the empty ch from the foundation ch below (see image below) In the following rows the spk tr will be worked into the top of the middle tr from 2 rows below. * Ch1, (tr, spk tr, tr) into the next ch1 sp. Repeat from * to end. Ch1, tr into the top of intital ch3 from Row 1.
Row 3Attach Yarn C and cut yarn B leaving a generous tail. Ch3 (counts as first tr), tr into the middle tr (spk tr) from round one (see image), tr into same sp. * Ch1, (tr, spk tr, tr) into the next ch-1 sp. Repeat from * to end.
Row 4Attach Yarn D and cut yarn C leaving a generous tail. Ch4, (counts as 1tr, ch1) and then work (tr, spk tr, tr) into the ch-1 sp. * Ch1, (tr, spk tr) in each ch-1 sp across the row. Ch1, tr into the top of intital ch3 from Row 1. Finish with a tr into the top of the beg ch3 from the previous row.
Row 5Attach Yarn A and cut yarn D leaving a generous tail. Ch3 (counts as first tr), spk tr, tr into same sp. * Ch1, (tr, spk tr, tr) into the next ch1 sp. Repeat from * to end.Repeat rows 2 – 5 three more times and fasten off.
Assembly
Step 1Step 1 – Twist your work before laying the two ends side by side (see image)
Step 2Step 2 – Using the generous tails, join the ends by threading a yarn needle and weaving them together. The cowl doesn’t have a designated right side, so twisting it won’t effect the design. You will notice that pink and orange don’t match up, but the grey and white will, making it almost seamless in appearance. If you want them to match exactly, don’t twist your cowl. I prefer a twist as it sits nicely.
Step 3Step 3 – After you have joined your two ends, using your 3.5mm hook and Yarn A work a border of dc around the cowl. Attach Yarn A at the join, working over the top of the tr stitches first. Work 1dc into each tr and ch sp. When you get to the start of the foundation chain work 1dc into each ch stitch. Because the cowl is twisted, you will continue to work dcs until you reach where you began. SS into the intial dc and fasten off. All done!
From the collection
Finishing
- Weave in the color-change tails as you go, but leave the four generous ends from each color join uncut.
- Twist the flat panel once, then lay the short ends side by side as directed.
- Thread a yarn needle with the generous tails and sew the two ends together to close the loop.
Why it works
The whole main pattern is worked flat in rows, not joined rounds, which is why there's no round-closing slip stitch anywhere in it.
Each spiked treble cluster reaches back to the row below it, so the color changes build texture instead of just stripes.
The cowl gets its loop shape entirely from the final seam, not from any shaping in the rows themselves.
What it becomes
- A cowl to layer over a wool coat when a scarf feels like too much fuss.
- A colorwork piece to carry in a bag for commutes, since the flat rows are easy to pick up and put down.
- A gift for someone who already owns plain scarves and would notice a stitch they haven't seen before.
Original pattern: https://redagapeblog.com/crochet-spiked-granny-cowl/
FAQ
Can I make the cowl longer or shorter?
Yes, alter the number of foundation chains and stick to multiples of four. The pattern is written to allow this adjustment directly.
Do I need to twist the cowl before seaming?
No, it's a preference. Twisting means the pink and orange stripes won't quite meet at the seam, while grey and white will.
What if I miscounted my foundation chain?
Chain a few extra stitches if you're unsure, then undo any excess at the end. It's easier to trim than to add chains partway through.
Why does row two mention an empty foundation chain?
The first color row's spiked treble has nothing to spike into yet, so it works into the empty ch from the very first foundation row. After that, each spike reaches into the middle treble two rows below.