Free Pattern
Step-by-Step
Crochet
Home DecorStar-shaped crochet pillow with two matching sides
A five-point star pillow built in rounds, with notes on plain or textured backs.
- Level
- Intermediate
- Time
- 4-6 hours
- Hook
- 4 mm
- Yarn
- Worsted
Pattern highlights
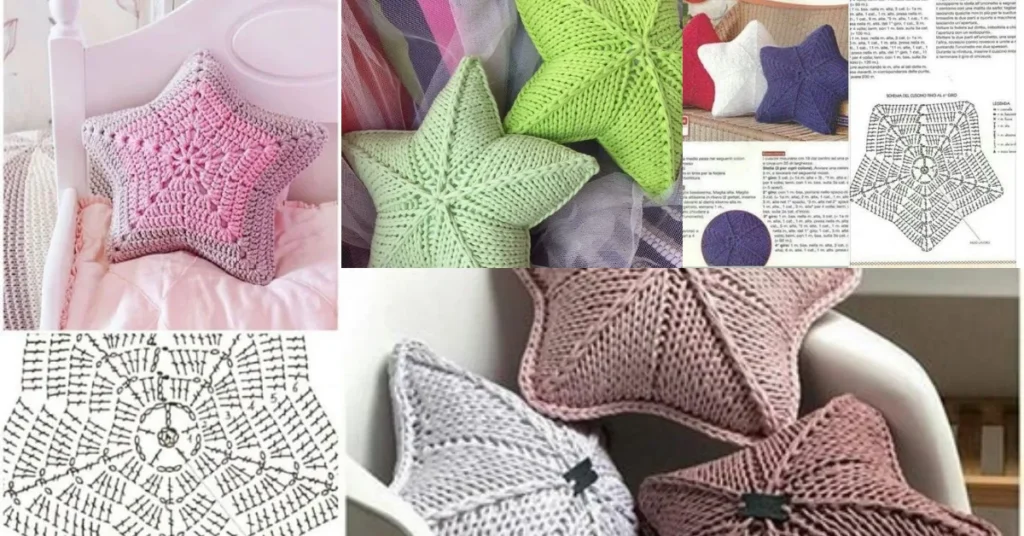
- Start the front panel with a magic ring and build up through the increase rounds to shape the star.
- Watch the points emerge as the double crochet increases spread the stitches outward each round.
- Decide how far to carry the increase pattern to reach the star size your pillow calls for.
- Crochet a second star for the back, choosing a plain version or a textured one to match the front.
- Line up the front and back panels before joining them around the edge.
- Leave a gap for stuffing, fill with fiberfill or an insert, then close the seam.
- Add any extras, like pom-poms at the points or contrast stitching along the edges.
About This Pattern
Every collector's notebook needs a shape file, and stars earn their own tab. This one is built as a pillow, which moves it out of the ornament drawer and onto the sofa. It's a good entry for anyone who has only made flat stars before and wants one with actual volume.
The technique here is straightforward round work: a magic ring center, then single crochet followed by double crochet increases that push the points outward. Nothing exotic, no cables or lace, just increase math done in a ring. That's exactly what makes it a good study piece for how stars get their points.
The finished object is two matching star panels, stuffed and joined into a pillow. It reads as a single sculptural shape rather than a round cushion. I like that it doesn't try to disguise its construction — you can see the rounds if you look.
Worth knowing
The satisfaction is in watching a plain ring turn into a pointed shape without any special stitches. Round 1 gives five single crochets, a small tidy base. Rounds 2 and 3 hand the shape its personality, doubling stitches and then alternating increases so the points start to separate from the body. It's the kind of increase logic you can watch happening under your hook. Making the back is its own small decision point — plain to keep things quick, or textured with shells or clusters if you want the two sides to argue a little. Either way you end with a pillow that has real presence, not just another round cushion in a stack of round cushions.
Common mistakes
- Losing count during the increase rounds Mark the start of each round with a stitch marker so the alternating increase pattern stays even. It's easy to drift by one stitch and end up with lopsided points.
- Pulling the magic ring closed too late Cinch the ring tight right after round 1's single crochets. A loose center leaves a visible hole at the star's middle.
- Mismatched front and back sizes Count rounds on the back star as you go if you want it plain, so it still matches the front's finished size. A textured back can differ in row count but should still meet the same edge.
- Stuffing unevenly at the points Push fiberfill into each star point separately before filling the center. Points flatten out fast if they're skipped.
- Closing the seam gap too small Leave enough of an opening to work fiberfill all the way into the star's points. A too-small gap makes stuffing the tips nearly impossible.

Intermediate
Progress Tracker
0 of 0 rounds
Tap a round to tick it off — your place is saved on this device.
The kit
Yarn
- Choose a soft, durable yarn like cotton, acrylic, or a cotton blend. The yarn should be medium weight (worsted weight) for a comfortable texture and suitable structure.
Crochet Hook
- For worsted weight yarn, a 4mm (G-6) or 5mm (H-8) hook works well.
Tapestry Needle
- For sewing the pieces together and weaving in ends.
Scissors
- For cutting the yarn when finished.
Tools
- Fiberfill or Pillow Insert : To stuff your pillow, you'll need fiberfill or a pre-made pillow insert. If you're using fiberfill, be sure to have enough to fill the pillow to your desired firmness.
Creating the Star
To begin, we need to crochet the star shape. This will form the base of your pillow.
Start with a magic ring . This will be the center of your star.
Round 1Work 5 single crochets (SC) into the magic ring. Pull the ring tight to close.
Round 2In this round, work 2 double crochets (DC) into each stitch around (10 stitches total).(10)
Round 3Work 1 DC into the first stitch , then work 2 DC into the next stitch . Repeat this pattern until you complete the round, increasing each alternate stitch (15 stitches total).(15)
Round 4For the next round, continue with a similar increase pattern to form the expanding points of the star. You can increase the stitches as necessary to create a larger star, depending on the size of your pillow.
Once your star shape reaches the size you want for your pillow, it’s time to move on to the next step.
You'll need to crochet a matching star shape for the back of the pillow. Use the same pattern, but you can decide if you want the back to be solid (without increases) or if you want it to have a few more textured rows to match the front. Simple Back: If you prefer a simple back, crochet a plain star without additional increases. Textured Back: Alternatively, you can add a textured back by repeating the increases or even adding a new pattern, such as a shell stitch or a cluster stitch, to make the pillow more interesting.
Assembly
Step 1Place the two stars together , with the right sides facing each other.
Step 2Use a whip stitch to join the two pieces together. Leave an opening at the top to insert your stuffing or pillow insert.
Step 3Stuff the Pillow : Once you’ve stitched most of the way around, stuff the pillow with fiberfill or insert the pre-made pillow form. Make sure to stuff it evenly for a full, comfortable pillow.
Step 4Close the Opening : Once the pillow is stuffed to your satisfaction, stitch the remaining opening closed with the whip stitch.
Finishing
- an extra touch of style, consider adding
- Pom-poms: Attach small pom-poms at the points of the star for a playful, fun effect.
- Decorative Stitching: Use contrasting yarn to add decorative stitches along the edges or around the star points to highlight the shape.
Why it works
Round 1's five single crochets set the star at five points from the very first round.
Rounds 2 and 3 double stitch counts through DC increases, which is what separates the points from the round base.
The back panel is worked as a second, separate star rather than in one continuous piece, so it can be plain or textured independent of the front.
What it becomes
- A statement cushion for a bed or reading chair, paired with plainer round or square pillows.
- A floor cushion for a kid's room, alongside soft rugs and low seating.
- A shelf or window-seat accent piece, set beside solid-color throws to let the star shape stand out.
Original pattern: https://crochetblog.net/star-pillow-free-knitting-pattern/
FAQ
Can I make the back simpler than the front?
Yes, that's built into the pattern as an option. A plain back without extra increases is fine and saves time, since it's hidden against the seating anyway.
What size hook should I use?
A 4mm or 5mm hook works with worsted weight yarn, per the materials list. Go with whichever gives you a fabric dense enough to hold stuffing without gaps.
How do I make the star bigger?
Continue the increase pattern from round 4 onward, adding stitches as needed for a larger star. The pattern leaves this open-ended so you can size it to your pillow.
Do I need a stuffing gap plan before I start?
It helps to decide where you'll leave the opening before you finish joining the panels. Somewhere along one edge, away from a point, is easiest to sew closed neatly.