
Free Pattern
Step-by-Step
Crochet
AmigurumiLittle sun amigurumi keychain crochet pattern
A small crocheted sun keychain built from two flat rounds joined with a picot ray edge.
- Level
- Intermediate
- Time
- 4-6 hours
- Yarn
- Worsted
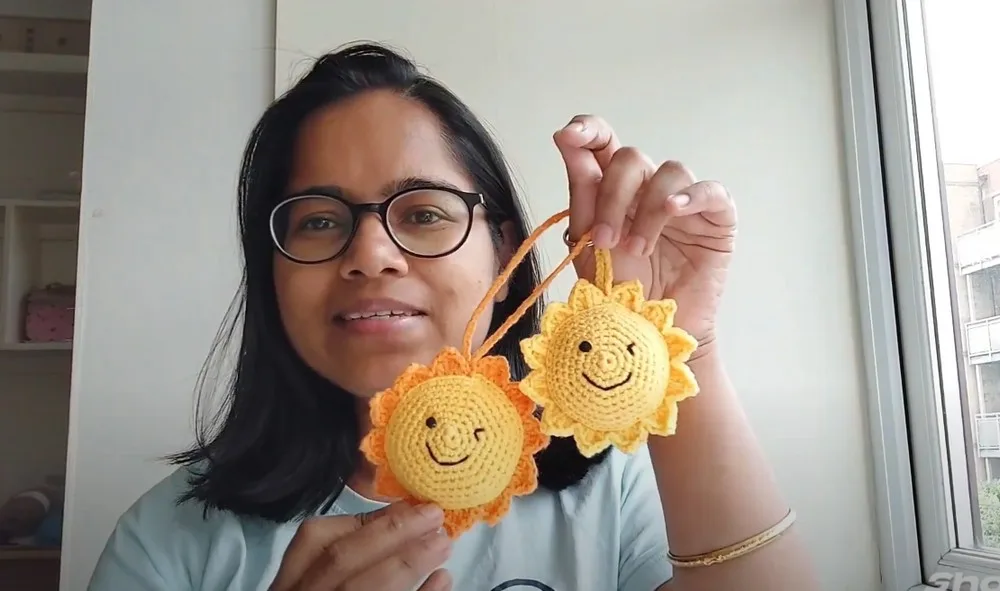
Pattern highlights
- Start each of the two body pieces with a magic ring, then increase steadily across four more rounds.
- Set both finished pieces back to back before doing any joining.
- Seam the pieces together using only the back loops, working from opposite ends of the pieces.
- Stuff lightly before the seam closes completely so the sun keeps its shape.
- Work the final ray round directly into the joined edge, alternating stitch heights to build points.
- Add a chain-and-slip-stitch picot between each ray for the pointed, sun-like finish.
- Attach a keyring once the rays are complete and ends are secured.
About This Pattern
Every collector's box of small makes needs a flat one eventually. Something you can toss on a bag clip without worrying about squashed stuffing. This sun keychain earns its spot there — two disks, a seam, and a ring of rays around the edge. Not showy, but tidy in a way I appreciate.
The interest here is in the edge, not the body. Two magic-ring rounds get worked separately and then joined through the back loops, which sets up a clean seam for the ray round. That last round stacks half double, double, and triple crochet into single stitches, with a chained picot tucked in between. It's a small lesson in stitch height doing visual work.
What comes out the other side is a keychain-sized sun with pointed rays and a lightly padded center. Light enough to clip anywhere. It's the kind of piece that photographs better than it sounds on paper — the picots catch shadow in a way flat crochet usually doesn't.
Worth knowing
The satisfaction is in that ray round. You're not just single crocheting around an edge — you're building height in one stitch (hdc, dc, tr) so each ray tapers to a point, then dropping a two-chain picot before slip stitching back down. It's a compact stitch-height exercise, twelve times over. The joining step before it is just as worth noting: back-loop-only seaming from two separate pieces gives you a defined ridge to work the rays from, so the edge reads crisp instead of blurred. For a small make, there's real technique packed into one round. It's the kind of detail that makes a keychain worth finishing instead of abandoning at round four.
Common mistakes
- Loose magic ring center Pull the tail firmly before the first round so no gap shows at the center of either disk.
- Uneven increase spacing Count stitches at the end of each increase round to keep the disk lying flat rather than cupping.
- Joining through both loops Check you're catching only the back loops when seaming, or the ray round won't have a clean edge to sit on.
- Overstuffing before closing Add stuffing gradually while seaming so the piece stays flat enough for a keychain, not rounded.
- Skipping the picot chain count Count to three chains before the slip stitch, or the picot points will look uneven around the sun.


Intermediate
Progress Tracker
0 of 0 rounds
Tap a round to tick it off — your place is saved on this device.
The kit
- Yarn
- Crochet Hook
- Keyring (Optional)
- Stuffing Material
- Needle
Making the Body
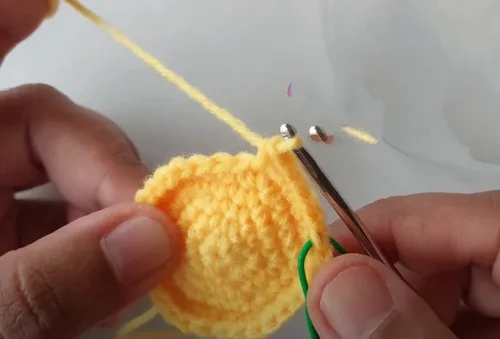
Round 1Start with a magic ring. If unsure how to make a magic ring, refer to the tutorial mentioned. Crochet six single crochets (sc) around this magic ring.
Round 2For each of the six stitches in the previous row, make two single crochets in each. This will double your stitches to 12.
Round 3Alternate between one single crochet and two single crochets in the next stitch. You end this row with 18 stitches.
Round 4Follow the pattern of one single crochet in the first stitch, one in the second, and two single crochets in the third stitch, leading to a total of 24 stitches by the end.
Round 5One single crochet in the first, second, and third stitches, followed by an increase (two single crochets in the same stitch) in the fourth stitch. Repeat around to end up with 30 stitches.
Round 6Single crochet in the first four stitches, then do an increase in the fifth stitch. Repeat around to have 36 stitches.
Round 7Single crochet in the first five stitches, then an increase in the sixth stitch. You will have 48 stitches by the end.
Round 8Single crochet in each stitch around without increasing. This will keep the count at 48 stitches.
Joining and Making the Rays: Create another piece identical to the first one for the back side.
Joining Pieces
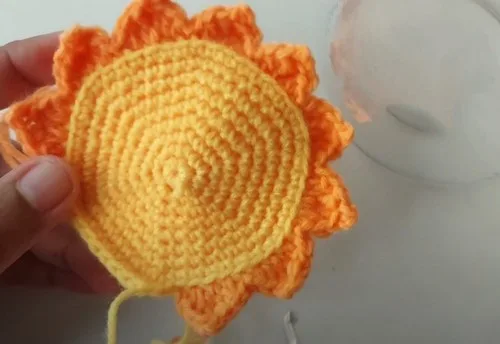
Place the two pieces with their back sides facing each other. Start joining from the first stitch of row 10 of the front piece and the second last stitch of row 10 of the back piece, using only the back loops.
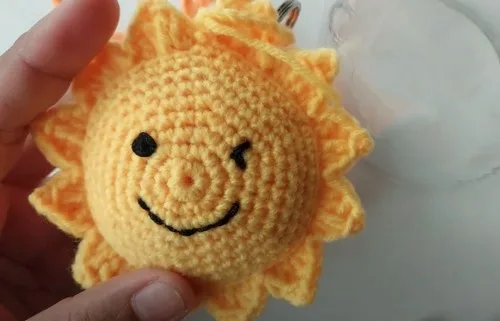
Round 11Making Rays Begin with a half double crochet (hdc), then make a double crochet (dc) in the same stitch. Next, create a triple crochet (tr) in the next stitch. Follow it with two chain stitches. Slip stitch into the third chain from the hook to form a picot. Repeat the sequence of stitches (triple crochet back into the same stitch, double crochet, and half double crochet in the next) to form a ray. Slip stitch into the back loop of the next stitch to secure the ray. Repeat around the edge to create a total of 12 rays.
Stuffing: After completing 9 rays, start stuffing the keychain. Continue stuffing as you complete the remaining 3 rays to ensure an even fill.
Final Touches: If you want to attach it directly to a keyring, make 20 chains and then slip stitch to form a loop before attaching it to the keyring. For a hanging string without a keyring, make 70 chains, then slip stitch in the round to create a loop.
Eyes and Lips: For the face details, eyes and lips can be added using black and red yarn respectively, through stitching or using safety eyes and embroidery.
From the collection
Finishing
- Weave in any loose ends from the magic rings and color changes before joining the two pieces.
- Add stuffing between the front and back pieces while the back-loop seam is still partly open.
- Complete the ray round around the joined edge, then attach the keyring to finish.
Why it works
The body is worked flat in rounds rather than shaped in the round, since two identical disks are needed before joining, not one continuous sphere.
Increases land in a standard amigurumi progression, doubling from six to twelve and then spreading further each round to keep the disk flat.
The join uses back loops only, which leaves front loops free and available for the final ray round to sit on top of a clean seam.
What it becomes
- Clip it to a backpack zipper where a small, flat charm won't snag or bulk up the pocket.
- Attach it to a keyring for everyday keys, pairing it with plain metal hardware so the rays stand out.
- Give it as a small handmade extra alongside a larger crocheted gift, like a scarf or tote.
Original pattern: https://crocheteverything.com/crochet-sun-amigurumi-keychain-tutorial-for-beginners/
FAQ
Do I need two separate pieces or can I crochet the sun in one piece?
This pattern makes two flat disks separately, then joins them. The two-piece method is what lets you stuff the sun before the ray round closes the edge.
What does the picot actually do in the ray round?
The two-chain slip stitch picot creates the little point at the tip of each ray. Skip it and the rays will look rounded instead of sun-like.
Is the keyring necessary?
No, it's listed as optional. Without it, the finished piece works fine as a small stuffed ornament or charm sewn onto something else.
Why join with back loops only instead of a whole-stitch seam?
Back-loop seaming leaves the front loops open, which is exactly where the final ray round needs to sit. A whole-stitch join would leave no clean edge for those stitches.