Free Pattern
Step-by-Step
Crochet
Bags & TotesA sunburst granny square tote in earthy neutrals
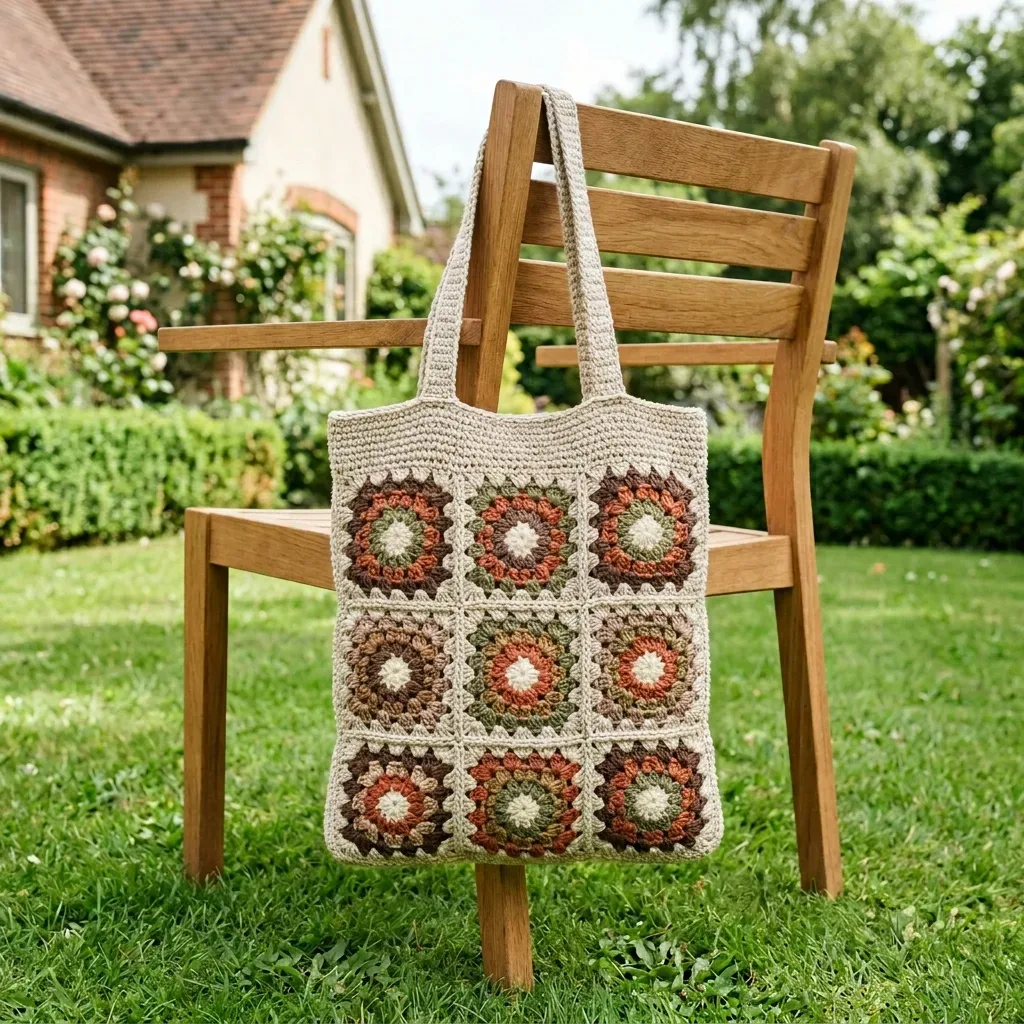
Eighteen puff-stitch granny squares join into a roomy tote with a top band and handles.
- Level
- Intermediate
- Time
- 12-16 hours
- Hook
- 5.0 mm
- Yarn
- Worsted
Pattern highlights
- Work the puff stitch round to create the sunburst petals, then build outer rounds in cream to frame the square.
- Repeat this process until you have enough squares to piece together into the tote body.
- Join the squares together, then work a top band in cream to clean up the edge.
- Add handles worked in cream to match the top band and all the joining seams.
- Weave in ends, then block the finished tote so it lays flat and holds its shape.
- Stitch in a fabric lining by hand if you want extra structure for carrying everyday items.
About This Pattern
Granny square totes are a notebook staple of mine — reliable, endlessly recolorable, always useful. This one earns its place with a sunburst twist: eighteen squares, each starting from a magic ring in cream, each blooming into puff-stitch petals before the outer rounds frame it in neutral tones. It's the kind of project I return to when I want repetition that still surprises me a little, square after square, until a whole bag emerges from near-identical parts.
The techniques here are approachable but not boring. Round 1 starts in a magic ring with fifteen double crochets. Round 2 introduces the puff stitch — yarn over, insert, pull up a loop, three times in the same spot, then draw through all seven loops together. That one stitch does the heavy lifting, turning a plain granny into a sunburst. After that it's double crochet rounds, joining as you go, then a top band and handles worked in cream.
The finished tote measures thirteen inches wide by fifteen inches tall, excluding handles — roomy enough for everyday errands. Worked entirely in worsted weight cotton, it has real structure, sturdy and machine-friendly rather than floppy. The earthy palette of rust, burnt orange, olive green, and chocolate brown against cream keeps all eighteen squares cohesive without feeling matchy. Add a fabric lining if you want extra support for carrying heavier things.
Worth knowing
What I love here is the puff stitch doing real work, not just decoration. Those seven loops drawn through together give Round 2 actual texture — a sunburst that catches light differently than a flat granny ever could. There's satisfaction in the rhythm too: magic ring, fifteen double crochets, puff round, then building out the frame, over and over for eighteen squares. Cotton yarn holds the stitch definition well, so every petal stays crisp. And because the cream yarn carries the center, outer frame, top band, handles, and joining, the whole piece reads as one cohesive object rather than eighteen separate squares stitched together. That cohesion, worked from simple repeats, is the quiet payoff.
Common mistakes
- Puff stitch loops slipping off hook Keep tension even on all seven loops before the final yarn over, and don't rush the draw-through.
- Magic ring pulled too loose Tug each tail firmly after the join so the center of Round 1 closes without a gap.
- Puffs landing in the wrong spot Count stitches as you go in Round 2 — one puff and one chain-1 per dc keeps the sunburst even.
- Color changes leaving bulky joins Join new colors with a slip stitch and leave long enough tails to weave in flat.
- Skipping the blocking step Block each square, or the finished tote, so the squares lie flat and the seams stay square.
Intermediate
Progress Tracker
0 of 0 rounds
Tap a round to tick it off — your place is saved on this device.
The kit
- You’ll need worsted weight cotton yarn (Category 4) in five colors. Here are the approximate amounts:
- Color Amount Needed
- Cream (MC) 550 to 600 yards (500 to 550 m)
- Rust 90 yards (82 m)
- Burnt Orange 90 yards (82 m)
- Olive Green 90 yards (82 m)
- Chocolate Brown 90 yards (82 m)
- The cream yarn does the heavy lifting here. It’s used for the center and outer frame of every square, plus the top band, handles, and all the joining. Buy a little extra to be safe.
- Lily Sugar’n Cream in Off White plus warm earth tones
- Paintbox Yarns Cotton Aran in Vanilla Cream, Rusty Red, Tomato Soup, Sage Green, and Coffee Bean
- Hobbii Rainbow Cotton 8/8 for a soft matte finish
- 5.0 mm (US H-8) crochet hook
- Tapestry needle or yarn needle
- Scissors
- Stitch markers
Optional
- a 12 by 15 inch cotton fabric panel for lining
Main Pattern
Round 1Cream Into a magic ring: ch 3 (counts as dc), 15 dc in ring. Join with sl st to top of beg ch-3. Pull the ring closed.Stitch count: 16 dc
Round 2Accent A Join with sl st in any dc. Ch 2, puff in same st, ch 1. Puff in next dc, ch 1. Repeat from * around. Join with sl st to top of first puff.
This forms the sunburst petals.
Stitch count: 16 puffs, 16 ch-1 spaces
Round 3Accent B Join in any ch-1 sp (this becomes a corner). (3 dc, ch 2, 3 dc) in corner sp, then 3 dc in each of next 3 ch-1 sps. Repeat from * three more times. Join to top of first dc.Stitch count: 48 dc, 4 corner spaces
Round 4Cream Join in any corner sp. Ch 3, (dc, ch 2, 2 dc) in same sp. Dc in each of next 12 dc. (2 dc, ch 2, 2 dc) in corner sp, dc in each of next 12 dc. Repeat from * around. Join to top of beg ch-3. Fasten off.Stitch count: 64 dc, 4 corner spaces
Each side of your finished square has 16 dc plus a corner space . These are the stitches you’ll seam through when joining.
Color Play and Square Count
The charm of this tote is that no two squares need to match. Keep Cream as the center and frame on every square, then mix the two accent rounds freely.
Suggested Color Combinations (Round 2 / Round 3)
Burnt Orange petals with Brown frame-in Olive petals with Rust frame-in Rust petals with Olive frame-in Brown petals with Burnt Orange frame-in
Olive petals with Brown frame-in Aim for a balanced scatter so no single color clusters in one corner of your finished bag.
How Many Squares to Make Panel Squares Needed Front panel 9 squares (3 across by 3 down)
Back panel 9 squares (3 across by 3 down)
Total 18 squares Joining the Panels
Lay out 9 squares in a 3 by 3 grid for the front and arrange the colors until you’re happy with the placement. Repeat for the back. Join with Cream using whichever method you prefer.
Method A: Whip Stitch Join
Step A1: Hold two squares right sides together. With Cream and a yarn needle, whip stitch through the back loops along one edge, one stitch per pair, corner to corner.
Stitch count: 16 stitches per edge
Step A2: Join squares into rows of 3, then join the rows the same way to complete a 3 by 3 panel. Make 2 panels.
Method B: Slip Stitch Join
Step B1: Hold two squares wrong sides together. Insert hook through the back loops of both squares and sl st across the edge for a visible braided ridge on the right side.
Stitch count: 16 sl sts per edge
Important tip: Whichever method you choose, keep your joining tension relaxed so the panels stay flat and square. Press or steam-block each finished panel before assembling the bag.
Assembling the Tote
With both panels made, you’ll seam them into a pouch along the two sides and the bottom, leaving the top open.
Seam the Pouch
Step 1: Place the front and back panels wrong sides together with edges aligned. With Cream, sl st or whip stitch up the right side, across the bottom, and down the left side. Leave the top edge open.
Result: 3 seamed edges Step 2: Turn right side out. Gently push out the bottom corners so the base sits flat and even.
Result: 1 open pouch Top Band
Step 3: Join Cream at a side seam at the top opening. Working in continuous rounds, sc evenly around the entire opening. Work 48 sts across the front edge and 48 across the back.
Stitch count: 96 sc
Step 4: Continue working sc in each st around, without increasing, for 9 more rounds (about 2¼ inches or 6 cm). Sl st to finish. Do not fasten off if adding handles next.
Stitch count: 96 sc each round
Optional variation: For a firmer band, work the rounds in hdc instead of sc. Same stitch count, just a little more height per round. Work 7 rounds for the same depth.
Making the Handles Make 2 straps using Cream yarn.
Strap Instructions Step 1: Ch 8. Sc in 2nd ch from hook and in each ch across. Turn.
Stitch count: 7 sc
Step 2: Ch 1, sc in each st across. Turn. Repeat this row until the strap measures about 22 inches (56 cm) for a comfortable 10-inch shoulder drop. Fasten off, leaving a long tail.
Stitch count: 7 sc each row Step 3: Make a second strap to match.
Optional reinforcement: For extra strength, fold each strap in half lengthwise and whip stitch the long edge closed before attaching.
Result: 2 straps Attaching the Handles
Step 4: Pin each strap end to the inside of the top band. Position them roughly above the seams between squares 1 and 2 and squares 2 and 3, about 4 inches (10 cm) apart.
Sew firmly with several passes through the band. Repeat on the back panel with the second strap.
Result: 4 secured ends Finishing Your Tote Weave in all remaining ends on the wrong side and trim Steam-block or wet-block the finished tote and lay flat to dry, easing it into shape
Optional: hand-stitch a fabric lining inside for added structure and to hold small items securely Caring for Your Tote Your beautiful new bag deserves proper care to keep it looking its best:
Hand wash in cool water with a gentle detergent. Avoid wringing.
Press out excess water in a towel, then reshape and dry flat Keep away from direct heat and harsh sunlight to protect the colors
Store flat or loosely stuffed so the squares hold their shape Make It Your Size Want a different size? Here are some easy modifications:
Bigger beach tote: Work a 4 by 4 grid (16 squares per panel) for a wider, taller bag Little market pouch: A 2 by 3 grid per panel makes a sweet mini tote
Deeper bag: Add 4 to 6 extra rounds to the top band before attaching handles Longer straps: Add length in the strap rows. Every 2¼ inches (5.5 cm) adds about 1 inch of drop
Firmer base: Single crochet a flat rectangle for the bottom and seam panels to it
Remember that changing grid size changes your yarn needs proportionally. Buy a little extra Cream since it does the most work in the borders, band, and handles.
Tips for Success
Block your squares before joining. This makes such a difference. Even if you’re not usually a blocker, trust me on this one. Blocking ensures all your squares are the same size, which means your seams will line up beautifully and your finished bag will hang properly.
Take your time with color placement. Before you start joining, lay out all 18 squares and shuffle them around. Step back and look at the overall effect. You want the colors distributed evenly so the bag looks balanced from any angle.
Reinforce those handles. Cotton yarn is sturdy, but bag straps take a lot of stress. The folding and whip stitching technique mentioned in the pattern really does add strength. Your future self will thank you.
Consider adding a lining. It’s optional, but a simple fabric lining prevents small items from poking through the gaps in the granny squares and adds structure to the bag.
Wrapping Up This Granny Square Tote Pattern
I hope you love making this crochet tote as much as I enjoyed putting together this pattern guide for you. The combination of colorful sunburst squares and that classic granny square construction creates something truly special. It’s the kind of bag that gets compliments at the grocery store and questions like "Did you really make that yourself?"
Yes, you did. And it looks amazing.
This crochet pattern is perfect for using up yarn from your stash or picking out a brand new color palette that speaks to you. Make it in the earthy neutrals shown here, or go wild with brights. The construction stays the same, but the possibilities are endless.
I’d love to see your finished totes! If you make this pattern, please save it to your Pinterest boards so you can find it again later, and don’t forget to leave a comment below sharing your color choices or any tips you discovered along the way. Happy crocheting!
Assembly
Step 1Weave in all remaining ends on the wrong side and trim
Step 2Steam-block or wet-block the finished tote and lay flat to dry, easing it into shape
Step 3Optional: hand-stitch a fabric lining inside for added structure and to hold small items securely
Finishing
- Weave in all remaining ends on the wrong side and trim close to the fabric.
- Steam-block or wet-block the finished tote, easing it flat and square while it dries.
- Hand-stitch a fabric lining inside, if you like, for extra structure and secure storage.
Why it works
Round 1 begins in a magic ring and builds fifteen double crochets, which pull closed into a tight, flat center.
The beginning chain-3 counts as the first double crochet, and the round closes with a slip stitch into its top, so joins land in the same spot every round.
Round 2 places one puff and one chain-1 space into each of Round 1's sixteen stitches, spreading the petals evenly with no shaping needed.
What it becomes
- A market tote for weekend grocery runs, with the cotton fiber sturdy enough for produce and jars.
- A roomy project bag for carrying yarn and a hook between a chair and the couch.
- An everyday carryall for books and a water bottle, paired with jeans and a plain tee.
Original pattern: https://crochetwithmia.com/earthy-neutrals-granny-square-tote-free-crochet-pattern/
FAQ
Can I use a different hook size than 5.0 mm?
You can, but gauge will shift and the finished tote may end up smaller or larger than thirteen by fifteen inches. Stick close to the H-8 if size matters to you.
Is the puff stitch hard to learn?
Not really — it's just three yarn-over-and-pull-up loops worked in the same stitch, then drawn through together. Give it a swatch square before diving into all eighteen.
How much yarn do I really need in each accent color?
About ninety yards each of rust, burnt orange, olive green, and chocolate brown, since they're only used for the puff rounds. Cream does far more work, so buy extra there.
Do I need to line the bag?
No, the lining is optional. It adds structure and helps the tote hold its shape when loaded, but the cotton granny squares stand fine on their own.