Free Pattern
Step-by-Step
Crochet
Bags & AccessoriesSunset Glow Sunburst Hobo Bag Free Crochet Pattern
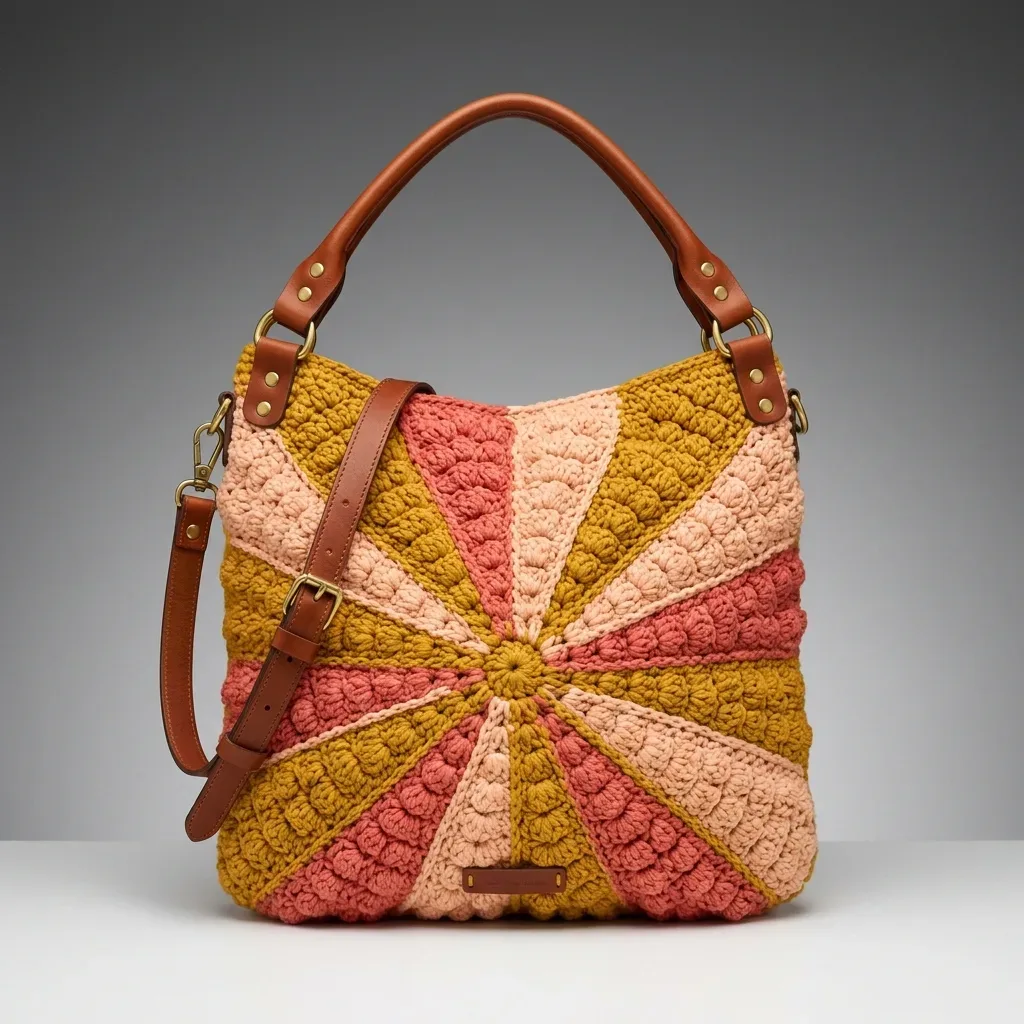
Crochet the Sunset Glow Sunburst Hobo Bag with bold bobble stitch texture, radiating wedges, and a leather strap for a chic handmade statement piece.
Level IntermediateTime 6-9 HoursHook 6.5 mmYarn Bulky
Pattern highlights
- Start each panel with a small magic-ring center and build outward through the first two foundation rounds.
- Establish eight evenly spaced wedge increase points that will shape the entire sunburst silhouette.
- Finish each panel with a single outer edge border round to neaten the perimeter.
- Repeat the entire panel from start to finish a second time so you have a matching pair.
- Seam the two sunburst panels together along their edges to form the hobo bag body.
- Cut, punch, and attach the faux leather strip using Chicago screws with the D-rings and slider buckle for the handle and crossbody strap.
- Weave in all yarn ends and add optional lining fabric before your finished bag is ready to carry.
About This Pattern
The Sunset Glow Sunburst Hobo Bag is built from two dramatic pinwheel panels worked in the round from a tiny center outward, radiating into eight bold wedges dressed in warm mustard, terracotta, and blush peach. What sets it apart is the bobble stitch texture layered across the wedges, giving the whole bag a sculptural, almost woven-basket quality you just don't get from flat single crochet. This one is perfect for crocheters who love a showpiece project and want a bag that gets noticed the moment they walk into a room.
You'll practice working bobble clusters, tracking wedge increases across four shaping sections, and joining rounds cleanly as the panel grows from a compact center to a full-sized hobo shape. This sits at an intermediate level thanks to the stitch counting through 13 rounds of combined bobble and increase work, plus the added leather strap assembly with rivets. Expect roughly six to nine hours total, spread across crocheting both panels, seaming, and attaching the hardware.
The finished bag lands as a substantial, structured hobo silhouette with a faux leather handle and adjustable crossbody strap, ready to carry everyday essentials in style. It has real weight and presence thanks to the dense bobble texture and bulky cotton-blend yarn, feeling more like a boutique accessory than a homemade project. This makes an outstanding gift for the fiber-arts lover in your life, or a proud one-of-a-kind piece to keep for yourself.
Variations
This pattern is begging for color experimentation since it's built on eight distinct wedges. Try an autumn palette Wool-Ease Thick & Quick in Pumpkin, Fig, and Wheat for a cozy fall market bag, or go cool-toned with dusty blue, sage, and cream for a coastal look. For a monochrome statement, work all wedges in one color but alternate matte and metallic bulky yarns so the bobble texture catches the light differently across sections. If you want a smaller crossbody version, work fewer rounds within Section 3 before starting the Outer Edge Border, stopping the panel a few rounds earlier so the wedges read shorter and the finished diameter shrinks — just be sure both panels match. For a bigger weekend tote, add extra plain rounds after Section 3 completes (before the border) worked in single crochet in your main color to increase the depth of the bag without disrupting the wedge count. Swap the bulky cotton-blend for a chunky wool blend like Bernat Roving if you want a softer, fuzzier finish, though you'll lose some bobble crispness. Skip the leather strap entirely and crochet a simple chain-and-shell strap in Mustard Gold for a fully yarn-based, vegan-friendly version. For gifting, work one panel in a solid neutral and the other in the full sunburst palette, then seam them together so the bag shows a surprise pop of color when opened. Adding a contrasting bobble color — say, working every other bobble in Salmon Pink against a Mustard Gold background — turns the sunburst into a two-tone starburst that reads even bolder from across the room.
I fell hard for this bag the moment the first bobble popped up on my hook. Watching a flat little center explode outward into eight glowing wedges in Mustard Gold, Terracotta Rose, and Blush Peach genuinely feels like crocheting a sunset. What I love most is how the bobble stitch texture builds across Section 3's thirteen rounds — each cluster nudges toward the right side, and by the end you've got this raised, dimensional surface that looks so much more advanced than it actually is to make. Pairing two identical panels means you get into a rhythm the second time around, and seaming them into a hobo silhouette feels incredibly satisfying. Then there's the leather strap and D-ring hardware, which take this from 'cute crochet project' straight into 'bag I'd actually buy in a shop.' It's the kind of make that keeps your hands busy but never bores you, since the wedge shaping and bobbles give every round a little job to do. If you've been wanting a project that feels like a real accomplishment, this is it.
Common mistakes
- Bobbles popping toward the wrong side of the fabric.
- After completing Step 5 and drawing through all 6 loops, physically push the bobble toward the right (public) side of the work with your finger before chaining 1 to lock it — this habit keeps every cluster facing forward.
- Losing track of the wedge increase placement across Sections 2 and 3.
- Place a stitch marker at the start of each of the 8 wedges right after Section 2 establishes them, then move the markers up every round so you always know exactly where each increase belongs.
- Forgetting that the closing chain 1 after a bobble doesn't count as a stitch.
- When counting stitches at the end of a round, skip over every bobble's closing chain — count only the bobble itself as 1 stitch, plus any regular stitches worked in the wedge.
- The two panels coming out slightly different sizes.
- Crochet both panels back to back rather than one after the other weeks apart, and check your stitch count against the same markers on both panels after every section before moving forward.
- Rivets or Chicago screws not lining up between the front and back strap attachment points.
- Mark both punch points with a fabric pen and clamp the leather strip and panel edge together before punching, checking alignment from both sides prior to inserting hardware.
Intermediate
Progress Tracker
0 of 0 rounds
Tap a round to tick it off — your place is saved on this device.
Materials
- Choose a yarn with good stitch definition and low stretch. Avoid fuzzy or halo yarns because they will hide your beautiful bobble texture. Cotton and wool blends hold their shape best for bags.
Some options that work beautifully
- Paintbox Yarns Simply Chunky in Mustard Yellow, Blush Pink, and Salmon Pink
Yarn
- Bulky weight (CYCA 5) cotton or cotton-blend yarn in three colors
Color A
- Mustard Gold, approximately 220 yards (201 m)
Color B
- Terracotta Rose, approximately 180 yards (165 m)
Color C
- Blush Peach, approximately 180 yards (165 m)
Total
- approximately 580 yards (530 m)
Hook
- US K / 6.5 mm crochet hook (adjust as needed to match gauge)
Notions
- Yarn needle for weaving ends
- Stitch markers, at least 8
- Two 1.5-inch D-rings in brass or antique gold tone
- One 1.5-inch adjustable slider buckle in brass or antique gold tone
- One 0.5-yard strip of tan or cognac faux leather, approximately 1.5 inches wide, for the top handle and crossbody strap
- Eight 10 mm brass Chicago screws or rivets
- Two small rectangular leather tabs (optional)
- Scissors
- Leather punch or sharp awl
- Lining fabric, 0.5 yard (optional but recommended)
- Sewing needle and thread if adding lining
Section 1: Sunburst Center
Foundation: Using Color A (Mustard Gold), make a magic ring.
- Round 1Chain 3 (counts as first dc here and throughout center section), work 15 dc into the ring. Pull ring closed. Join with sl st to top of beginning ch-3. (16 dc)
- Round 2Chain 1 (does NOT count as a stitch here and throughout unless stated). Work 2 sc in each stitch around. Join with sl st to first sc. (32 sc)Fasten off Color A.
Section 2: Establishing the 8 Wedge Increases
In this section you establish 8 evenly spaced increase points, dividing the 32 stitches into 8 groups of 4 stitches each. Place a stitch marker in the increase stitch of each group at the end of Round 3 to track positions.
Join Color A in any stitch.
- Round 3Chain 1. (Sc in next 3 sts, 2 sc in next st) repeat 8 times. Join with sl st to first sc. (40 sc) Place markers in each of the 8 increase stitches just made.
- Round 4Chain 1. (Sc in next 4 sts, 2 sc in marked st) repeat 8 times, moving markers to new increase sts as you go. Join with sl st to first sc. (48 sc)
- Round 5Chain 1. (Sc in next 5 sts, 2 sc in marked st) repeat 8 times, moving markers. Join with sl st to first sc. (56 sc)
- Round 6Chain 1. (Sc in next 6 sts, 2 sc in marked st) repeat 8 times, moving markers. Join with sl st to first sc. (64 sc)Checkpoint: After Round 6, your panel should measure approximately 5 to 6 inches (12.5 to 15 cm) in diameter. If your panel is measuring significantly smaller or larger, adjust your hook size before continuing.Fasten off Color A.
Section 3: Bobble Texture and Continued Wedge Shaping
Beginning in this section, the wedge sections are worked with bobble stitches filling the interior of each wedge. The increase stitch at the tip of each wedge remains a plain sc (not a bobble) for clean shaping.
Color sequence for Rounds 7 through 18: Rounds 7 and 8: Color B (Terracotta Rose)
Rounds 9 and 10: Color C (Blush Peach)
Rounds 11 and 12: Color A (Mustard Gold)
Rounds 13 and 14: Color B (Terracotta Rose)
Rounds 15 and 16: Color C (Blush Peach)
- Round 17and 18: Color A (Mustard Gold) Join Color B in any marked increase stitch.
- Round 7Chain 1. Work the following 8-stitch sequence 8 times around: (2 sc in marked increase st, bob in next st, sc in next st, bob in next st, sc in next st, bob in next st, sc in next st, bob in next st). Join with sl st to first sc. (72 sts) Move markers to the first sc of each increase pair.
- Round 8Chain 1. Work the following 9-stitch sequence 8 times: (2 sc in marked st, bob, sc, bob, sc, bob, sc, bob, sc). Join with sl st to first sc. (80 sts)Checkpoint: After Round 8, your panel should measure approximately 7 to 7.5 inches (18 to 19 cm) in diameter.Fasten off Color B. Join Color C.
- Round 9Chain 1. Work the following 10-stitch sequence 8 times: (2 sc in marked st, sc, bob, sc, bob, sc, bob, sc, bob, sc). Join with sl st to first sc. (88 sts)
- Round 10Chain 1. Work the following 11-stitch sequence 8 times: (2 sc in marked st, sc, bob, sc, bob, sc, bob, sc, bob, sc, bob). Join with sl st to first sc. (96 sts)Fasten off Color C. Join Color A.
- Round 11Chain 1. Work the following 12-stitch sequence 8 times: (2 sc in marked st, bob, sc, bob, sc, bob, sc, bob, sc, bob, sc, bob). Join with sl st to first sc. (104 sts)
- Round 12Chain 1. Work the following 13-stitch sequence 8 times: (2 sc in marked st, bob, sc, bob, sc, bob, sc, bob, sc, bob, sc, bob, sc). Join with sl st to first sc. (112 sts)Checkpoint: After Round 12, your panel should measure approximately 10 inches (25.5 cm) in diameter.Fasten off Color A. Join Color B.
- Round 13Chain 1. Work the following 14-stitch sequence 8 times: (2 sc in marked st, sc, bob, sc, bob, sc, bob, sc, bob, sc, bob, sc, bob, sc). Join with sl st to first sc. (120 sts)
- Round 14Chain 1. Work the following 15-stitch sequence 8 times: (2 sc in marked st, sc, bob, sc, bob, sc, bob, sc, bob, sc, bob, sc, bob, sc, bob). Join with sl st to first sc. (128 sts)Fasten off Color B. Join Color C.
- Round 15Chain 1. Work the following 16-stitch sequence 8 times: (2 sc in marked st, bob, sc, bob, sc, bob, sc, bob, sc, bob, sc, bob, sc, bob, sc, bob). Join with sl st to first sc. (136 sts)
- Round 16Chain 1. Work the following 17-stitch sequence 8 times: (2 sc in marked st, bob, sc, bob, sc, bob, sc, bob, sc, bob, sc, bob, sc, bob, sc, bob, sc). Join with sl st to first sc. (144 sts)Fasten off Color C. Join Color A.
- Round 17Chain 1. Work the following 18-stitch sequence 8 times: (2 sc in marked st, sc, bob, sc, bob, sc, bob, sc, bob, sc, bob, sc, bob, sc, bob, sc, bob). Join with sl st to first sc. (152 sts)
- Round 18Chain 1. Work the following 19-stitch sequence 8 times: (2 sc in marked st, sc, bob, sc, bob, sc, bob, sc, bob, sc, bob, sc, bob, sc, bob, sc, bob, sc). Join with sl st to first sc. (160 sts)Checkpoint: After Round 18, your panel should measure approximately 13 to 14 inches (33 to 35.5 cm) in diameter.Fasten off Color A.
Section 4: Outer Edge Border
The border stabilizes the edge and provides a clean surface for seaming.
Join Color A in any stitch.
- Round 19Chain 1. Sc in each stitch around, working plain sc (no bobbles). Join with sl st to first sc. (160 sc)Fasten off Panel 2, leaving a 12-inch (30.5 cm) tail for weaving.
Do NOT fasten off on Panel 1 (you will use this yarn end to begin seaming).
Panel (Make 2)
Both panels are identical, so follow these instructions twice.
Assembly
- Step 1Wet blocking is recommended for cotton or cotton-blend yarns. Soak the completed panels in cool water for 15 minutes. Gently squeeze out excess water without wringing. Lay flat on blocking mats or a clean towel and pin to shape, coaxing each panel into a flat, even circle. Allow to dry completely before seaming or handling (24 to 48 hours depending on humidity).
- Step 2For wool yarns, steam block by holding a steam iron approximately 1 inch above the surface. Do not press down onto the bobbles or you will flatten them.
- Step 3After blocking, weave in all remaining yarn ends securely, going in at least two directions through the yarn fabric to prevent unraveling.
Important notes
💡 Use a US K / 6.5 mm hook as your starting point, but swatch the first two rounds of the Sunburst Center to confirm your bobbles sit flat and don't curl the fabric — size up or down as needed.
💡 Keep at least 8 stitch markers on hand and dedicate one color of marker specifically to the wedge increase points so you never confuse them with round-end markers.
💡 Because this project uses three colors, wind Mustard Gold, Terracotta Rose, and Blush Peach into separate bobbins or cakes before starting so you're not hunting through a tangled skein mid-round.
💡 When working the magic ring center described in the intro, pull the tail firmly closed and weave it in immediately so the very center of your sunburst doesn't develop a visible gap.
💡 Punch your leather strap holes with a leather punch or sharp awl rather than scissors for clean, round holes that seat the Chicago screws securely without tearing.
💡 If adding the optional lining, cut and baste it to the wrong side of each panel before seaming the two crochet pieces together so the raw fabric edges stay hidden inside the finished bag.
Original pattern: https://crochr.com/sunset-glow-sunburst-hobo-bag-free-crochet-pattern/
FAQ
What yarn weight and hook size does the Sunset Glow Sunburst Hobo Bag use?
This pattern calls for bulky weight (CYCA 5) cotton or cotton-blend yarn, roughly 580 yards total across three colors, worked with a US K / 6.5 mm hook. Adjust your hook size slightly if your bobbles feel too loose or too tight to match gauge.
How many colors do I need and how much of each?
You'll need three colors: about 220 yards of Mustard Gold, 180 yards of Terracotta Rose, and 180 yards of Blush Peach. The sample uses Paintbox Yarns Simply Chunky in Mustard Yellow, Blush Pink, and Salmon Pink.
Is the bobble stitch difficult for a confident beginner to learn?
The bobble is a 5-double-crochet cluster worked in one stitch and closed with a chain 1, which takes a little practice but becomes rhythmic quickly. If you can already make a double crochet, you'll pick up the bobble within your first few attempts in Section 3.
What hardware do I need for the strap and handle?
You'll need two 1.5-inch D-rings, one 1.5-inch adjustable slider buckle, eight 10mm brass Chicago screws or rivets, and a 0.5-yard strip of tan or cognac faux leather for the handle and crossbody strap. A leather punch or sharp awl is essential for clean hardware holes.
Can I make this bag without sewing or leatherworking experience?
Yes — attaching the faux leather strap with Chicago screws is a punch-and-screw process rather than traditional sewing, so no stitching skills are required. Just work slowly when punching holes and double-check alignment between panel and strap before securing the hardware.