Free Pattern
Step-by-Step
Crochet
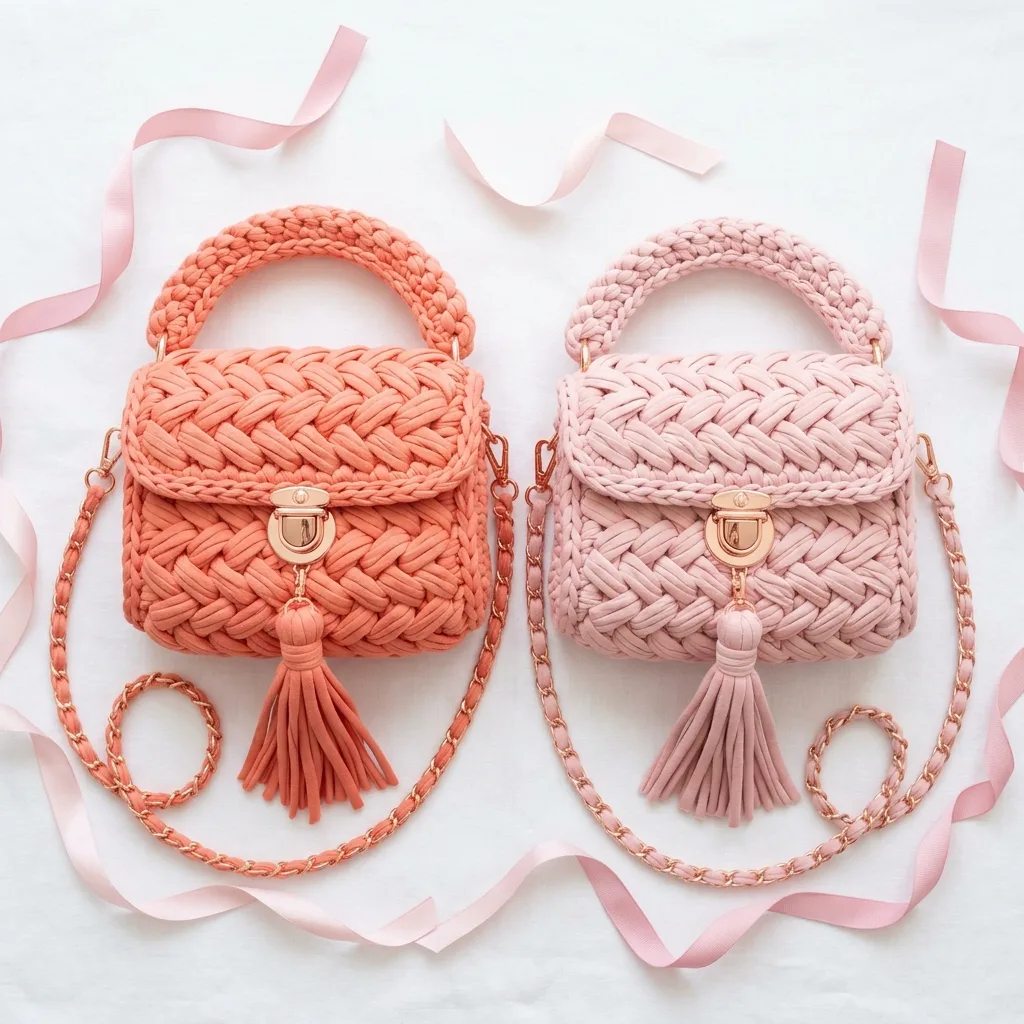
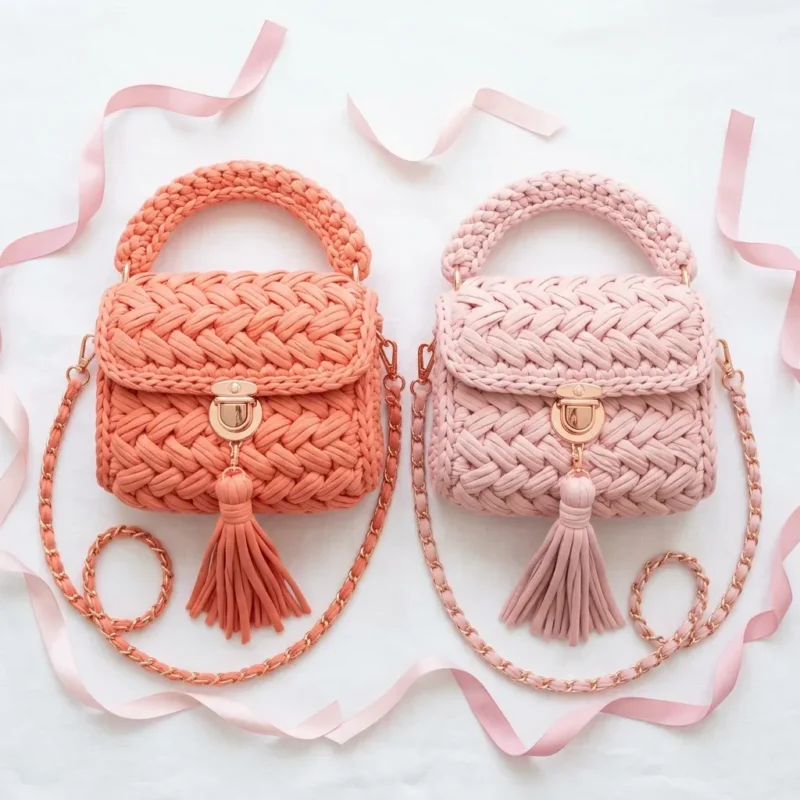
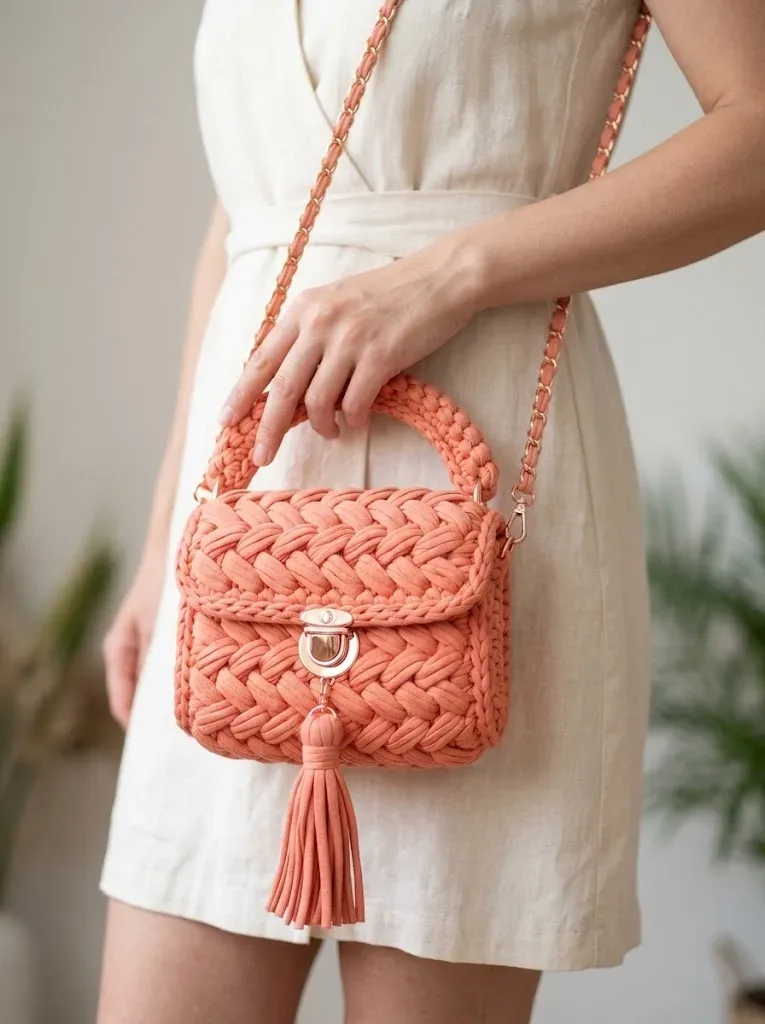
Bags & TotesSunset peach basket weave t-shirt yarn clutch
A sturdy t-shirt yarn clutch built with a basket weave stitch and a flap worked flat separately.
- Level
- Intermediate
- Time
- 4-6 hours
- Hook
- 8 mm
- Yarn
- T-shirt yarn (Jersey)
Pattern highlights
- Work a setup round of single crochet around the base, adding extra stitches at each corner so it lies flat.
- Crochet a plain round of double crochet to give the basket weave something sturdy to grab onto.
- Alternate front post and back post double crochet in blocks, swapping their positions every round to build the woven look.
- Keep repeating that swap for several rounds until the body of the clutch reaches its full height.
- Set the body aside and work the flap flat in rows, using the same alternating post stitches.
- Attach the finished flap to the back of the bag so it folds forward over the opening.
- Add a lining and a closure, such as a magnetic snap, if you want a cleaner interior and a secure top.
About This Pattern
Most of the bags in my notebook are soft and slouchy. This one is not. It is built from t-shirt yarn on a big hook, so it lands closer to the structured end of my collection, somewhere between a basket and a purse. I like having one pattern that holds its shape without wire or buckram.
The technique doing all the work here is basket weave, made by trading FPdc and BPdc blocks every round. A plain dc round sets the stage first, giving the stitches below something tidy to post into. The flap is worked flat in rows rather than in the round, which keeps its edges straight for attaching later.
What comes out is a boxy little clutch, firm enough to sit upright on a table. It is the kind of piece that looks heavier than it is, thanks to the open basket texture breaking up what would otherwise be a dense slab of fabric. A lining is optional but suggested.
Worth knowing
I love this one because it behaves like upholstery, not like a scarf. The FPdc and BPdc blocks swap places every round, so you are reading your own stitches to know where to post next, which keeps the basket weave honest instead of guessed. Working the flap flat, separately from the body, means you can check it against the bag before attaching anything. T-shirt yarn forgives a lot, but it still rewards a firm, even hand. There is something satisfying about a crochet project that does not flop when you set it down. This is a bag you make for the structure as much as the color.
Common mistakes
- Working too loose for the bag's purpose Go down a hook size if the fabric feels floppy. This clutch needs a firm hand to hold its shape.
- Losing track of front post vs back post Check each stitch against the one below it before you post into it. The pattern swaps posts every round, so a quick glance saves ripping back.
- Skipping the corner increases on the setup round Miss those extra stitches in the corners and the base will curl instead of lying flat. Count the stitches in each section as you go.
- Attaching the flap off-center Lay the flap over the bag opening before stitching it down. Pin or clip it in place first so it does not shift.
- Treating t-shirt yarn tails like regular yarn ends Thick jersey yarn does not weave through stitches the usual way. Tuck the tail into the fabric and let the yarn's own grip hold it.
Intermediate
Progress Tracker
0 of 0 rounds
Tap a round to tick it off — your place is saved on this device.
The kit
- 200-250 grams of t-shirt yarn in your chosen color (I used a soft coral peach and dusty rose pink)
- T-shirt yarn is typically sold by weight rather than yardage since it varies so much in thickness
- 8mm or 9mm crochet hook (use whichever gives you a firm, structured fabric)
Optional
Matching fabric for lining Magnetic snap as a backup closure Gauge and Finished Dimensions Gauge: 8 stitches and 6 rows = 4 inches (10cm) in basket weave pattern
Finished Size: Approximately 7 inches wide x 6 inches tall x 2.5 inches deep (18cm x 15cm x 6cm), not including handle
Gauge is genuinely important here because we want a firm, structured fabric. If your stitches are too loose, the bag will be floppy and will not hold its shape. Do not be afraid to go down a hook size if needed.
Stitch Abbreviations and Definitions
Ch = Chain: Yarn over, pull through the loop on your hook. This creates the foundation and is used for turning.
Sl st = Slip stitch: Insert hook, yarn over, pull through both the stitch and the loop on your hook in one motion. Used for joining.
Sc = Single crochet: Insert hook, yarn over and pull up a loop (2 loops on hook), yarn over and pull through both loops.
Dc = Double crochet: Yarn over, insert hook, yarn over and pull up a loop (3 loops on hook), yarn over and pull through 2 loops, yarn over and pull through remaining 2 loops.
FPdc = Front post double crochet: Yarn over, insert your hook from front to back to front around the post (the vertical part) of the stitch below, complete as a regular double crochet. This pushes the stitch forward toward you.
BPdc = Back post double crochet: Yarn over, insert your hook from back to front to back around the post of the stitch below, complete as a regular double crochet. This pushes the stitch backward away from you.
St(s) = Stitch(es)
Rep = Repeat Understanding the Basket Weave Stitch
Here is the thing that makes this stitch look so impressive while being totally manageable. The basket weave is created by alternating front post and back post double crochets in groups. When you work around the post of a stitch instead of into the top, it creates texture and dimension.
Picture it like this: front post stitches pop toward you, back post stitches recede away from you. By grouping them in sets of two or three and then swapping which type you use every couple of rows, you create those beautiful woven-looking blocks.
If you have never done post stitches before, practice on a swatch first. It takes a few tries to find the post confidently, but once you feel it, it becomes second nature.
Step by Step Crochet Pattern Base of the Bag The base is worked flat in rows using single crochet for maximum density and structure.
Round 1Ch 15. Sc in 2nd ch from hook and in each ch across. (14 sts)
Rounds 2–8Ch 1, turn. Sc in each st across. (14 sts) You should now have a firm rectangular base measuring approximately 7 inches by 2.5 inches.
Body of the Bag Now we will work in continuous rounds up from the base, creating the sides of the clutch.
Part 4
Round 1Setup Round Do not turn. Working around the entire perimeter of the base, sc evenly around. Work 14 sc across the short end, 3 sc in the corner, 8 sc along the long side, 3 sc in the corner, 14 sc across the other short end, 3 sc in the corner, 8 sc along the remaining long side, 3 sc in the corner. Place a stitch marker at the beginning of the round. (56 sts)
Round 2Dc in each st around, moving your stitch marker up as you go. (56 sts)
Round 3(Begin Basket Weave): *FPdc around each of the next 2 sts, BPdc around each of the next 2 sts* Rep from * around. (56 sts)
Round 4*BPdc around each of the next 2 FPdc from previous round, FPdc around each of the next 2 BPdc from previous round* Rep from * around. (56 sts)
This is where the magic happens. You are essentially doing the opposite of what you did before. Where you had front posts, now work back posts. Where you had back posts, now work front posts.
Rounds 5-6: Repeat Rounds 3-4.
Rounds 7-8: Repeat Rounds 3-4.
Rounds 9–12Continue alternating the basket weave pattern, keeping the rhythm of switching your FPdc and BPdc groups every two rounds.
At this point, your bag body should measure approximately 5 inches tall from the base. If you want a taller bag, continue the pattern for additional rounds.
Final Round: Sc in each st around. Sl st to first sc. Fasten off. (56 sts)
Flap
The flap is worked separately and then attached. This gives you more control over placement.
Round 1Ch 29. Dc in 3rd ch from hook and in each ch across. (27 sts)
Round 2Ch 2 (does not count as a stitch throughout), turn. *FPdc around each of the next 3 sts, BPdc around each of the next 3 sts* Rep from * across, ending with FPdc in last 3 sts. (27 sts)
Round 3Ch 2, turn. *BPdc around each of the next 3 FPdc, FPdc around each of the next 3 BPdc* Rep from * across. (27 sts)Rows 4-5: Repeat Rows 2-3.
Round 6Ch 2, turn. Sc2tog (single crochet two together to decrease), work in established basket weave pattern to last 2 sts, sc2tog. (25 sts)Row 7: Ch 2, turn. Work in pattern across. (25 sts)Row 8: Ch 2, turn. Sc2tog, work in pattern to last 2 sts, sc2tog. (23 sts)
Round 9Ch 1, turn. Sc in each st across. Fasten off, leaving a long tail for seaming. Top Handle
The handle is a simple braided-look crocheted strip.
Part 6
Round 1Ch 31. Sc in 2nd ch from hook and in each ch across. (30 sts)
Rounds 2–4Ch 1, turn. Sc in each st across. (30 sts) Fasten off. The handle will measure approximately 6 inches long and about 1 inch wide.
Tassel
Cut approximately 20-25 strips of t-shirt yarn, each about 6 inches long. Bundle them together. Take a separate piece of yarn about 12 inches long, fold it in half, and wrap it tightly around the bundle about 1 inch from the top to create the tassel head. Secure with a knot and use the tails to attach to the flap.
Assembly Instructions
1. Attach the Flap: Position the flap at the back of the bag opening, with the straight edge aligned with the back edge. Using your tapestry needle and matching yarn, whip stitch the flap securely in place.
2. Install the Push Lock Clasp: Mark the center of your flap and the corresponding center front of your bag body. Follow the hardware instructions for your specific clasp. Most push locks require you to cut small holes for the prongs or posts. Take your time here.
3. Attach the Handle: Using the D-rings, attach each end of the handle to the sides of the bag, just below where the flap meets the body. You can sew the D-rings directly to the bag or create small fabric loops to hold them.
4. Add the Chain Strap: Thread your chain strap through the D-rings. Adjust the length to your preference for crossbody or shoulder wear.
5. Attach the Tassel: Sew the tassel to the center bottom of the flap, just below the push lock.
Tips for Success
Work with consistent tension throughout. T-shirt yarn can be stretchy, so try to keep your stitches even without pulling too tight.
When working post stitches, make sure you are going around the post itself, not accidentally going through the top of the stitch. It should feel like you are hugging the stitch from the side.
Block your pieces before assembly if needed. You can wet block t-shirt yarn by dampening it and pinning it to shape, then letting it dry completely.
If the basket weave pattern feels confusing at first, remember this simple rule: look at what you did in the previous round and do the opposite for each stitch type.
Customization Ideas
This clutch pattern is wonderfully adaptable. Try making it larger by increasing your base dimensions and adding more rounds to the body. Use contrasting colors for the flap and body. Swap the chain strap for a leather one or a crocheted strap. Add a fabric lining for a more polished interior finish.
You could also skip the crossbody strap entirely and use this as a pure clutch or top-handle bag for evening events.
I truly hope you enjoy making this Sunset Peach Woven Crochet Clutch as much as I enjoyed designing it. It is one of those projects that feels so satisfying to complete because the finished result looks genuinely impressive. Thank you so much for trusting me with your crafting time. If you make one, I would absolutely love to see it! Tag me on Instagram or share it in our Facebook group so I can cheer you on.
If this pattern is calling your name, go ahead and pin it to your crochet project board so you can find it when you are ready to start. And please drop a comment below if you give it a try. I read every single one and love hearing about your color choices and any tweaks you make along the way!
From the collection
Finishing
- Weave in yarn tails by tucking them into the thickness of the t-shirt yarn rather than threading a needle.
- Attach the flap to the back edge of the bag, checking it sits centered before securing it.
- Add the lining fabric and sew in a magnetic snap, if using, as the final closure step.
Why it works
The setup round places three single crochet stitches in each corner, which is what turns a flat rectangle into a box shape.
The plain double crochet round sits between the base and the basket weave, giving the posts below a clean row to work into.
The flap is made flat in rows instead of in the round, so both side edges stay straight before it gets attached to the body.
What it becomes
- An everyday carryall for keys, a phone, and a wallet when a full-size bag feels like too much.
- A market or errands bag, since the firm basket weave fabric holds its shape with some weight inside.
- A textured accessory to pair with plain, solid-color outfits, letting the woven stitch pattern do the talking.
FAQ
Can I use regular yarn instead of t-shirt yarn?
You could, but you would lose the structure that makes this clutch stand on its own. T-shirt yarn's thickness is what lets the basket weave read clearly at this scale.
How do I know if my hook size is right?
Check the gauge before committing to a full bag. If your fabric feels soft or floppy, size down the hook until it feels firm and structured.
Is the basket weave pattern hard to follow?
It is repetitive once you see the logic: wherever there was a front post, work a back post, and the reverse. The tricky part is the first couple of rounds, after that your eyes catch the pattern.
Do I need to line the bag?
Lining is listed as optional in this pattern, mostly for a cleaner interior and a place to anchor a magnetic snap. The basket weave fabric itself is dense enough to hold its shape without one.