Free Pattern
Step-by-Step
Crochet
Bags & TotesTextured crochet shoulder bag with a flap pattern
A panel-based crochet bag pattern with a textured stitch, rounded flap, and adjustable strap.
- Level
- Confident Beginner
- Time
- 6-9 hours
- Hook
- 4 mm
- Yarn
- Medium (Worsted)
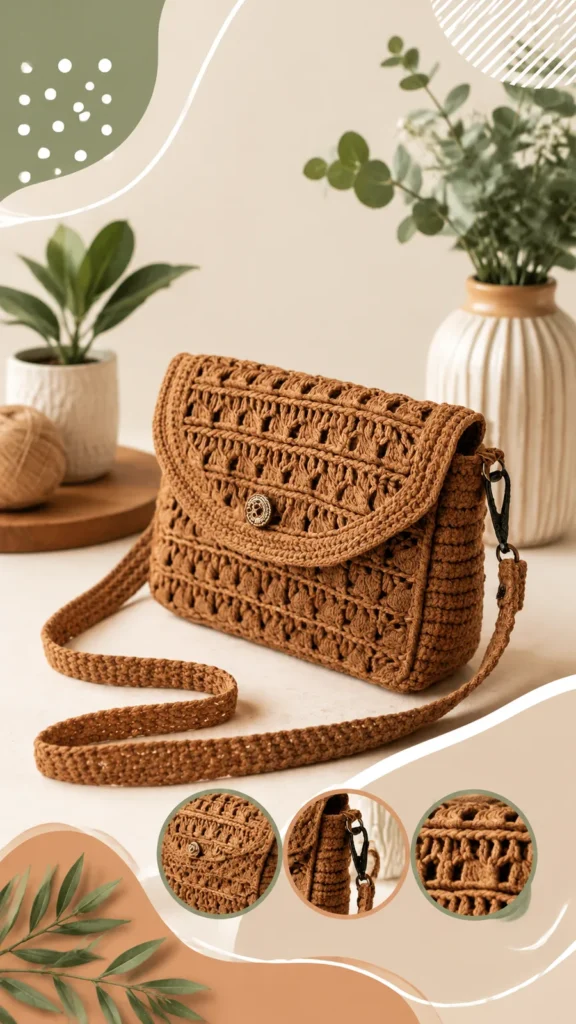
Pattern highlights
- Chain and work the back panel first, building rows of single crochet topped with textured cluster stitches.
- Work the front panel the same way, then shape the flap by leaving stitches unworked at each edge.
- Crochet the side and bottom gusset as one long strip of plain single crochet rows.
- Join the front panel, back panel, and gusset to form the bag's three-dimensional shape.
- Add the strap by chaining and working single crochet rows until it reaches shoulder length.
- Weave in ends, block the panels lightly, and attach the button or magnetic closure.
About This Pattern
I file this one under practical makes, the bags and totes rather than the show pieces. It sits well next to other panel-built accessories in my notebook. A front panel, a back panel, a gusset: that is a familiar shape in crochet bag design. I like patterns that treat structure as the starting point, not an afterthought. This one asks for patience across rows rather than clever shaping. That suits a confident beginner looking to build skill.
The techniques are straightforward on paper. Dense single crochet builds the foundation, while a textured cluster stitch adds the raised, woven look. That texture repeats across both panels. The flap is worked flat with simple shaping made by leaving stitches unworked rather than true decrease stitches. The gusset is just a long strip of single crochet rows, worked separately and joined later. Nothing here is unfamiliar, but working from memory with three row types takes focus.
Finished, this becomes a structured shoulder bag with real depth, not a flat pouch pretending to hold things. The rounded flap and button closure give it a tidy, finished face. At roughly 9 inches wide, 7 inches tall, and 3 inches deep, it holds a reasonable amount. It never feels bulky. The long strap works for shoulder wear, and the pattern notes it can be shortened for crossbody use. It reads as handmade, not homespun.
Worth knowing
What I like here is the honest texture. The textured cluster stitch repeats every few stitches, building a raised, woven surface without lace-weight fuss. It is satisfying because the effect reads as complicated but the stitch itself is simple. Working the front and back panels as flat rectangles keeps the counting easy. I can watch a show while I work. The flap shaping, done by leaving stitches unworked at each edge, gives a rounded edge without short rows. And the gusset strip, worked separately, means I am not fighting bulk at a round seam. For a confident beginner, this is a chance to practice texture and simple shaping in one project. There is a useful object waiting at the end.
Common mistakes
- Losing count after cluster rows Textured cluster stitches can pull in width. Count stitches at the end of every row.
- Miscounting the flap's unworked stitches Leaving five stitches unworked at each edge is easy to misjudge. Mark the spot with a stitch marker first.
- Gusset length not matching panels The gusset strip must match the combined edge of both panels. Measure against the assembled panels before fastening off.
- Strap worked to the wrong length The strap length is adjustable by adding or removing rows. Pin it on and try the bag before fastening off.
- Skipping the blocking step Unblocked panels can curl along the textured rows. A light block relaxes the stitches without stretching the bag.
Confident Beginner
Progress Tracker
0 of 0 rounds
Tap a round to tick it off — your place is saved on this device.
The kit
- Medium weight cotton or cotton blend yarn: approximately 500 yards (457 meters)
- 4 mm (US G/6) crochet hook
- 1 medium button or magnetic closure
- Yarn needle
- Scissors
- Stitch markers
- Optional fabric lining for extra structure
Back Panel
Chain 41.
Round 1Sc in second ch from hook and across. Turn. (40 sts)120 Ch 1, sc across. Turn. Fasten off when the strap reaches approximately 40 inches (102 cm). Adjust the length by adding or removing rows.
Round 2Ch 1, sc across. Turn. (40 sts)
Round 3Ch 1, sc in first 2 sts, textured cluster in next st, *sc in next 3 sts, textured cluster in next st; rep from * across, sc in last 2 sts. Turn. (40 sts)
Round 4Ch 1, sc across. Turn. (40 sts)Rows 5-32: Repeat Rows 3-4 thirteen times. Fasten off.
Side and Bottom Gusset
Chain 9.
Round 1Sc in second ch from hook and across. Turn. (8 sts)
Round 260 Ch 1, sc across. Turn. Fasten off. This strip creates the depth of the bag. The length may be adjusted slightly to match the front and back panels.
Front Panel
Work the same as the back panel through Row 26.
Flap shaping:
Round 27Ch 1, sc across. Turn. (40 sts)
Round 28Sl st across first 5 sts, sc across next 30 sts, leave remaining 5 sts unworked. Turn. (30 sts)
Round 29Ch 1, sc across. Turn. (30 sts)
Round 30Sc2tog, sc across until 2 sts remain, sc2tog. Turn. (28 sts)
Round 31Ch 1, sc across. Turn. (28 sts)
Round 32Sc2tog, sc across until 2 sts remain, sc2tog. Turn. (26 sts) Continue decreasing 2 stitches at each end every other row until 14 stitches remain. Fasten off.
Special Stitch: Textured Cluster
Step by step: Chain 9.
Textured Cluster: In one stitch, work (yarn over, insert hook, pull up loop) three times, yarn over and pull through all loops on hook, then secure with 1 chain. This creates a raised decorative texture.
Assembly
Step 1Weave in all yarn ends securely. Lightly block the panels before assembly if needed. Blocking helps relax the stitches and creates a more polished shape. Avoid stretching the bag too aggressively because a structured accessory should maintain its form.
Finishing
- Weave in every yarn end from the panels, strap, and gusset before assembly.
- Lightly block the front and back panels so the textured cluster rows sit flat and even.
- Sew on the button or attach the magnetic closure where the flap meets the body.
Why it works
The back panel's Row 3 places a textured cluster every third stitch, creating an evenly spaced raised pattern.
The front panel repeats the back panel pattern exactly through Row 26, then shifts into flap shaping.
The gusset is worked flat as a single strip, letting it bend around the sides without a seam.
What it becomes
- A daily shoulder bag for running errands, paired with simple cotton or linen layers.
- A market bag, since the depth from the gusset holds produce without sagging.
- A crossbody bag for travel days, once the strap is shortened to a comfortable length.
Original pattern: https://duniarecipe.com/easy-quick-crochet-ideas-handmade-crochet-bag-pattern-inspiration/
FAQ
Can I make this bag wider?
Yes. Increase the starting chain by multiples of two and add rows for height, as the pattern notes.
Do I need to line the bag?
No, lining is optional. The pattern suggests fabric lining only if you want extra structure.
What yarn works best for the texture?
Cotton or a cotton blend shows off the textured cluster stitch well. Acrylic blends work too if you prefer more drape.
Why is the gusset worked separately instead of in the round?
Working it as a flat strip makes it easier to match against the front and back panels. It also avoids counting increases around a round seam.