Free Pattern
Step-by-Step
Crochet
Motifs & AppliquesThree crochet butterfly patterns from simple to layered
Three crochet butterfly motifs, from a simple wing round to a dimensional layered version.
- Level
- Intermediate
- Time
- 1-4 hours
- Yarn
- Worsted
Pattern highlights
- Start with a small ring, whether chained or made as a magic circle, to anchor the whole motif.
- Work the first round of double crochets, or double and treble crochets together, into that ring.
- Slip stitch to close the ring before shaping begins, keeping the center compact and tidy.
- Chain and cluster stitches around the ring to fold the flat circle into wing shapes.
- the four-wing version, repeat single crochet clusters around the loop to form each wing.
- the layered version, attach a second yarn color and build another set of wings over the first.
- Fasten off, weave in ends, and fold the finished motif gently at the center to seat the wings.
About This Pattern
Butterfly motifs live in the small-project drawer of my notebook, next to flowers and leaves I never finished counting. This one gives three versions instead of one, so I can pick a wing shape to match the mood. The simplest is a ring worked twice; the fussiest layers two colors of wings on top of each other. All three start from the same idea: a tight center ring that blooms outward into wings. I like collections like this — one motif, three moods, same basic geometry underneath.
The technique worth noting here is how the wings form directly from the foundation ring, with no separate wing pieces to sew on later. Round one builds a tidy ring of double crochets, or, in the four-wing version, adds treble crochets at the center for extra height. Round two turns that ring into wings by chaining and clustering stitches around it. The 3D pattern goes further, working a second layer of wings in a contrasting color over the first, so the wings stand apart instead of lying flat.
What comes off the hook is small — a flat or slightly ruffled appliqué you can pin, sew, or glue almost anywhere. The single-color versions finish quick, ready to weave in and attach. The layered version takes longer, since it asks for extra rounds and a second yarn color, but it rewards you with wings that actually lift off the surface. Either way, you end up with something light enough for a onesie and sturdy enough for a keychain.
Worth knowing
There's something satisfying about a pattern that does two jobs at once — the same round that finishes the center also shapes the wings, no extra construction step hiding in the middle. I like that the four-wing version brings in treble crochets just for the center cluster, a small height change that makes the whole motif feel less flat. The layered 3D version is the real payoff: working a second color of wings directly into the same ring, rather than stitching two motifs together, means the layering happens as you go, not after. It's a quick make with a real technical moment in it — the ring-to-wing transition — which is more than most appliqués usually offer.
Common mistakes
- Skipping the slip stitch join Missing the join leaves the ring open and the wings uneven. Always slip stitch into the top of the starting chain before moving on.
- Crowding the treble crochets Treble crochets need more space than double crochets in the same loop. Keep tension loose so the center doesn't pucker.
- Losing the magic circle tail In the 3D version, the ring stays open into round two. Pull the tail snug before the final join so it doesn't loosen later.
- Attaching the second color unevenly When starting the outer wing layer, join the new yarn right at the top of the inner wings, not partway along a stitch.
- Flattening the wings by pressing hard Folding at the center should be gentle. Pressing too firmly undoes the lift the second wing layer is meant to give.


Intermediate
Progress Tracker
0 of 0 rounds
Tap a round to tick it off — your place is saved on this device.
The kit
- Worsted weight yarn
- Crochet hook (size to suit your yarn)
- Contrasting or second color yarn (for the 3D butterfly's outer wing layer and for the body/antennae detail)
Pattern 1: Simple Mini Butterfly
This mini butterfly is easy and fast, making it perfect for beginners. It's a sweet little motif you can finish in minutes!
Make a Magic Ring: Wrap the yarn around your fingers and pull through to form a ring.
Round 1Chain 3 (counts as your first double crochet), then crochet 11 more double crochets into the ring. Slip stitch into the top of the starting chain to join. You should have 12 double crochets in total.
Round 2Creating Wings Chain 3, double crochet in the same stitch, chain 2, double crochet 2 times in each stitch around to form wings. Fasten off and weave in ends.
Pattern 2: Classic Butterfly with Wings
This pattern offers a slightly larger butterfly with more detailed wings, perfect for attaching to bags, hats, or even framed as wall decor.
Start with a Chain: Chain 4 and slip stitch into the first chain to form a loop.
Round 1Body & Wings Chain 3 (counts as double crochet). Work 3 double crochets, 3 treble crochets, and 3 more double crochets, all into the loop.
Round 2Work 4 single crochets to create each wing shape. Repeat around the loop to complete all four wings.Finish: Slip stitch to join and shape the butterfly by folding gently at the middle. Secure with a contrasting yarn as an optional body detail.
Pattern 3: 3D Butterfly with Layered Wings
For those looking to add a more realistic, dimensional butterfly to their project, this 3D pattern brings the motif to life with layered wings.
Make a Magic Circle and chain 3.
Inner Layer of Wings:
Round 1Into the magic circle, make 4 double crochets, 3 treble crochets, and 4 more double crochets. Pull the ring closed but do not tie off.
Round 2Chain 3 and repeat the wing pattern (4 double crochets, 3 treble crochets, 4 double crochets) again in the same circle. Slip stitch to join.
Outer Layer of Wings: Using a second color, attach yarn to the top of the inner wings.
Outer RoundWork 6 double crochets around each previous stitch to create a flared effect.Finishing: Tie off, weave in ends, and fold the wings together. Use a black or contrasting yarn to form the body by winding it around the middle a few times.
Finishing
- Weave in yarn ends at the center where rounds joined, keeping the ring tight.
- Fold the motif gently along the center to give the wings a slight lift.
- the layered version, secure the second color at the top of the inner wings before weaving in that tail too.
Why it works
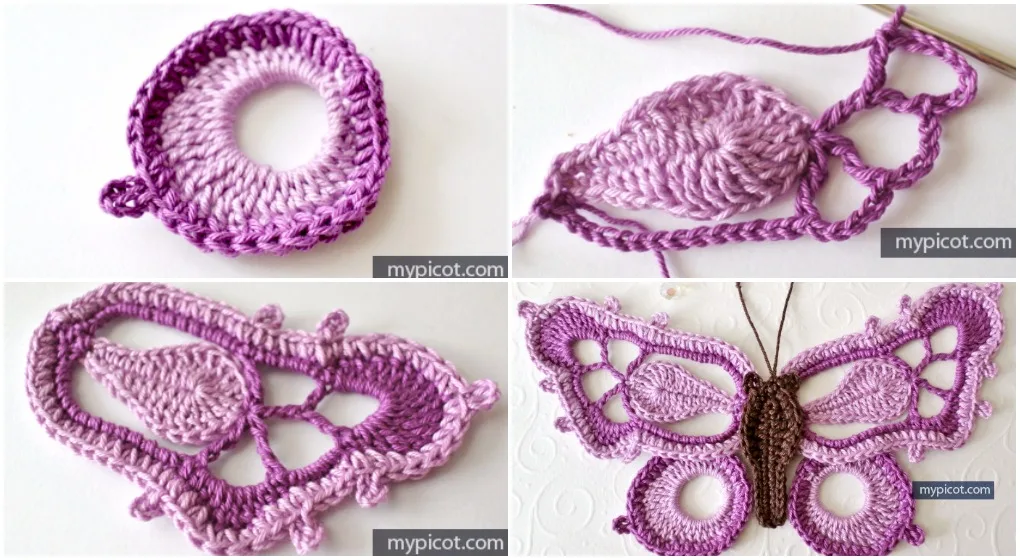
In the first pattern, wings appear in round two, when a chain and double crochet increase turns the plain ring into wing shapes.
The second pattern moves the shaping earlier, working double and treble crochets into a single loop, then adding single crochet wings in round two.
The 3D pattern is worked flat in layers: two rounds built into one closed circle, then a second color of wings attached on top of the first.
What it becomes
- Pin one to a baby onesie or hat for a soft, handmade accent.
- Frame a few in a shadow box alongside pressed leaves or dried flowers for wall art.
- Glue a small motif to a hairpin or barrette for an everyday accessory.
Original pattern: https://crochetblog.net/crochet-beautiful-butterfly/
FAQ
Which of the three versions is quickest to make?
The first pattern, with its two rounds of double crochet, finishes fastest. The four-wing and 3D versions take longer because of the treble crochets and extra layer.
Do I need two yarn colors?
Only for the 3D version, where a second color builds the outer layer of wings. The other two patterns use a single color throughout.
Can I use a magic circle instead of a chain ring?
The 3D pattern calls for a magic circle, while the other two start from a chain ring. Either method works as a foundation as long as the center stays tight.
Why does the ring stay open in round two of the 3D version?
The pattern keeps the circle unclosed so a second round of wing stitches can be worked into the same loop. It's only joined with a slip stitch once both rounds are complete.