Free Pattern
Step-by-Step
Crochet
AccessoriesTiger stripe scarf and cap set for teens
A striped scarf-and-cap set joined with puff stitches, worked flat in two contrasting colors.
- Level
- Intermediate
- Time
- 4-6 hours
- Hook
- 3.0 mm
- Yarn
- Sport
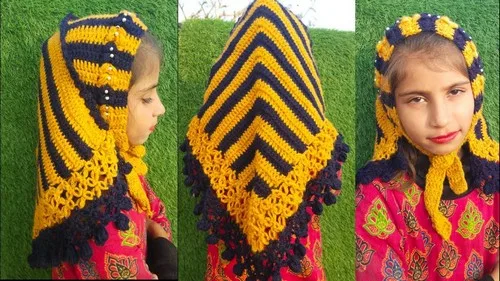
Pattern highlights
- Start the back panel at a magic circle and increase steadily until it forms a triangle shape.
- Work the starting strap flat in straight rows, keeping the stitch count fixed the whole way.
- Increase the panel for about 8 inches, then reverse direction with alternating decrease rows.
- Join the back panel to the strap with a puff-stitch decrease that closes the cap shape.
- Add Not Stitch fringe and edging around the joined piece, finishing the last round with Pop Stitches.
- Align the curved panel edges and single crochet them together with picot and puff stitches worked in.
About This Pattern
I keep a shelf for two-piece sets — the scarf that arrives with its own cap, no separate pattern hunt required. This one earns its spot. It's built from a triangular back panel and a straight strap, joined at the end into one continuous accessory. Tiger stripes aren't really a stitch pattern — they're a color trick, two yarns alternating every two rows until the fabric reads as banded fur. I like pieces that let color do the heavy lifting instead of a fussy stitch count.
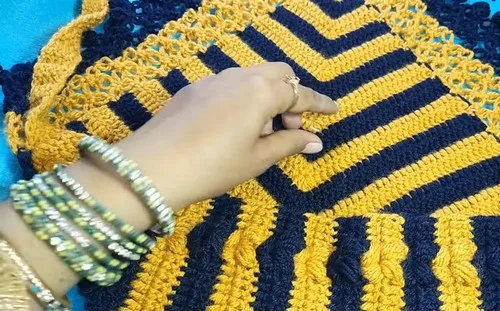
The back panel starts at a magic circle and grows by DC increases at the center of every row, alternating between three-stitch and five-stitch jumps. A puff stitch set — puff, chain two, puff — sits right at that center point, marking the increase line in texture as well as shape. The strap is worked flat in straight rows, no shaping at all, which makes it the calm middle of an otherwise busy build. Fringe and edging come last, using a Not Stitch loop-and-single-crochet combination I hadn't met before this project.
Finished, this reads as a scarf that ends in a soft, brimmed cap — no separate hat to misplace. The triangle panel curves into the crown, the strap trails down as the scarf body, and the striped color change runs the whole length without a break. Fringe and Not Stitch edging finish the border with movement instead of a plain hem. It's a wearable that photographs well precisely because the stripes do something a solid color never could.
Common mistakes
- Center increase drifts off-center Mark the center stitch of the panel with a locking stitch marker so the increase point stays consistent as the triangle grows.
- Puff stitches pulled too flat Leave a little slack in each loop before closing it, or the puff-chain-puff set at the center loses its texture.
- Mixing up the two decrease methods Track which row skips the first stitch and which row ends in DC2TOG, since the pattern alternates them row by row.
- Not Stitch loops come out uneven Keep the long loop the same length on every repeat, or the fringe edge reads ragged instead of deliberate.
Intermediate
Progress Tracker
0 of 0 rounds
Tap a round to tick it off — your place is saved on this device.
The kit
Yarn
- 4-ply, two colors for the tiger stripe look
Hook
- Hook: 3.0 mm
Back Panel Triangle
Round 1Magic Circle Ch 3, 4 DC in circle (5 DC total)(5)
Round 2Ch 3, DC, 3 DC in center, DC in rest
Round 3Ch 3, DC across, 5 DC in center, DC in restAlternate 3 DC and 5 DC center increases every row. Change color as desired. Continue for 32 rows total.
Fringe and Decorative Edging
Round 1Work Not Stitches (long loop, SC into loop) in sets of 2, skip 2 rows, SC to joinAdjust at corners by working extra repeats.
Rounds 2–3Repeat sequence, join into SC from previous rowRow 3 corner: Work 3 Not Stitches at corner join Final Row: Replace 2 Not Stitches with 1 Not Stitch + 2 joined Pop Stitches + 1 Not Stitch, repeat around edge
Scarf Strap and Front Cap Panel
Round 1Make a slip knot and chain 7. Skip first 3 chains, DC in the 4th chain and next 3 chains (5 DC total)(5)
Rounds 2–24Ch 3, turn, 1 DC in each stitch (5 DC per row, 24 rows total)
Cap IncreaseWork 4 DC on the front edge, increase at the back edge by adding DCs. Add Puff Stitch Set (Puff, Ch 2, Puff) in the center of rows. Change color every 2 rows. Continue increasing for 17 rows or about 8 inches.
Cap DecreaseDecrease by skipping first stitch on one row, then DC2TOG at the end of the next row. Alternate decreases for 17 rows until only 5 DC remain. Finish by joining cap back to strap with a 4-stitch decrease over puff stitches.
Finishing StrapWork 24 rows of 5 DC to mirror the starting strap
Assembly
Step 1Align curved edges of front cap panel and back panel
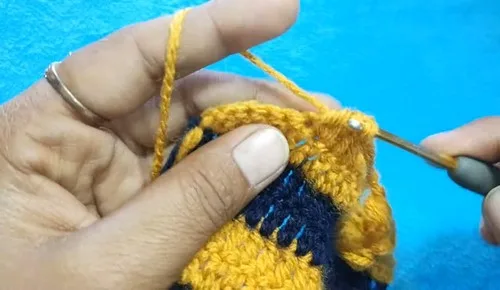
Step 2Join yarn and work Picot/Puff stitches along edge while joining panels with SC
From the collection
Finishing
- Weave in every yarn end left behind from the frequent color changes before joining anything.
- Work the Not Stitch and Pop Stitch edging around the joined edges last, once the seam is secure.
Why it works
The back panel's increases sit at the center of every row, not at the edges, which is what turns flat rows into a triangle.
The starting strap holds a constant DC count across all its rows, so it stays a straight flat strip with no shaping.
Decreases alternate between skipping a stitch at the row's start and working DC2TOG at its end, tapering the panel from two directions instead of one.
What it becomes
- An everyday cold-weather accessory for a teen who wants one piece that does scarf and hat duty.
- A handmade gift for someone who likes visible stitchwork — the stripes and fringe read as intentional, not busy.
- Layered over a plain jacket, where the tiger stripes and fringe edge become the outfit's focal point.
Original pattern: https://crocheteverything.com/teen-crochet-scarf-and-cap-pattern-set-in-tiger-stripes/
FAQ
Can I make the stripes with more than two colors?
The pattern is built around alternating two colors every two rows. You could add a third, but the tiger-stripe effect comes from just two contrasting shades working against each other.
Why is the strap worked flat with no shaping?
The starting strap keeps the same stitch count in every row on purpose. It's meant to be the straight scarf body, not shaped like the curved cap panel.
How does the flat panel actually turn into a cap shape?
The back panel increases at its center every row, which curves it into a triangle. Once that triangle joins to the strap, the curve becomes the crown.
What is the puff stitch set doing in the middle of the rows?
It sits right at the increase point, marking the center visually while adding texture between the plain DC stitches on either side.