
Free Pattern
Step-by-Step
Crochet
AmigurumiTiny Crochet Crab Amigurumi Pattern With Legs and Claws
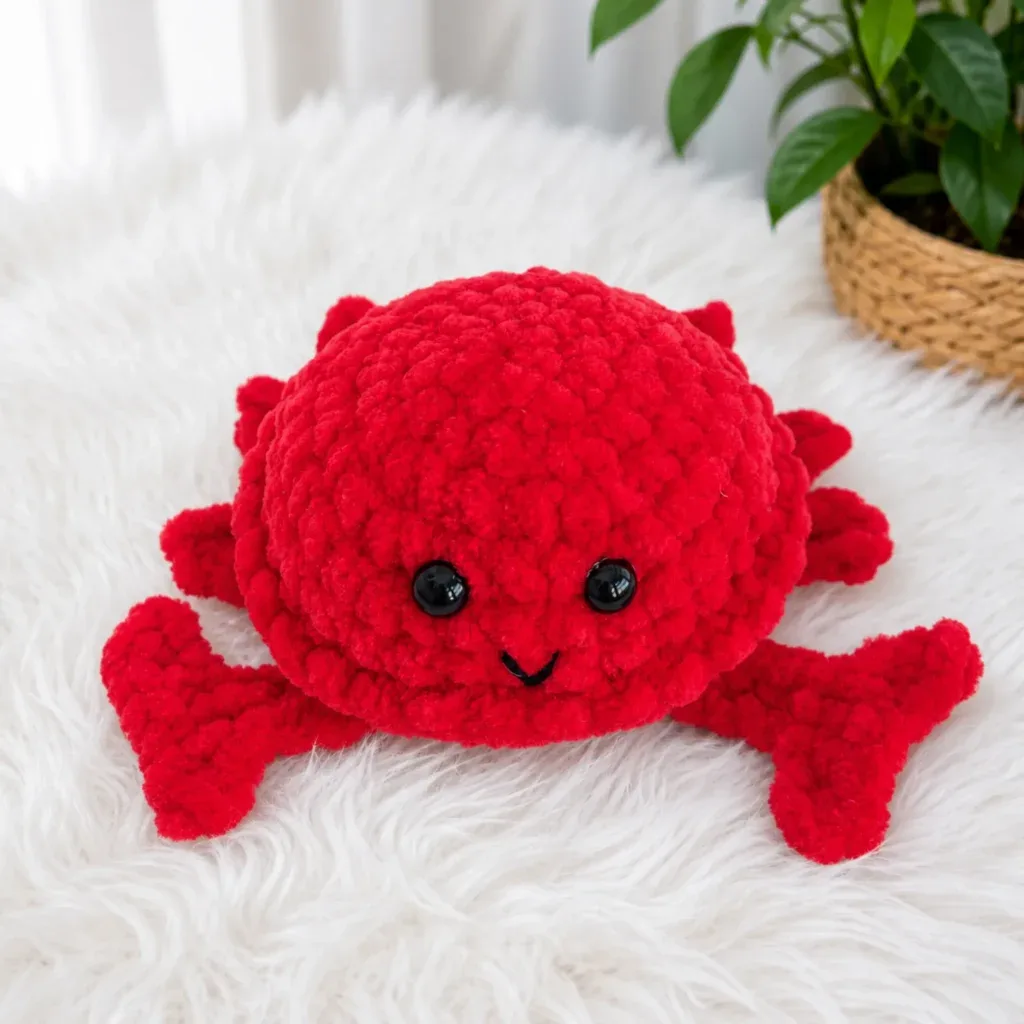
A small chenille crab worked in one spiral, with inline legs and claws.
- Level
- Intermediate
- Time
- 4-6 hours
- Hook
- 3.5 mm
- Yarn
- Super Bulky
Pattern highlights
- Start the body at the center and increase steadily over the first several rounds to build a domed shape.
- Work the middle rounds even, without further increases, to bring the body to its widest point.
- Reach the attachment round, where the claws and legs are built into the body stitch by stitch.
- Stuff the body firmly before it closes, since access disappears fast after this point.
- Decrease steadily over the closing rounds to bring the opening down to nothing.
- Fasten off, cinch the last stitches shut, and settle the safety eyes before any embroidery.
- Embroider a small mouth in black yarn, then weave in every remaining end.
About This Pattern
I keep a small drawer of sea creatures, and a crab was overdue. This one sits at the beginner-to-intermediate line — simple sphere shaping, but with legs and claws that ask you to work two things at once. It's the kind of pattern that teaches a real skill without pretending to be advanced.
The technique worth noting is the inline attachment. Instead of crocheting six legs and two claws separately and sewing them on after, you build them into a single working round. It's a neat trick, and it means fewer ends to weave in later, which I count as a genuine mercy.
The finished crab is small, round, and made in chenille or velour yarn, so it has that slightly plush, worn-in look before it's even stuffed. One color for the shell, a stitch or two of black for the mouth. It reads as a shelf piece more than a toy, though it would survive either job.
A note on specs: this pattern is written in US crochet terminology, and gauge is not critical here — consistent, firm tension matters more than an exact stitch count, so stuffing doesn't show through. The finished crab measures approximately 3–4 inches across the shell. The body is worked in a continuous spiral with no joins, so keep a stitch marker at the start of each round to track your place.
Worth knowing
The appeal here is the inline round — Round 9 carries the body, both claws, and all six legs at once, worked as one continuous piece. It's a small feat of pattern engineering, and following it feels like solving a short puzzle rather than just repeating stitches. The body itself is a plain increasing sphere, so there's nothing to fear there; the challenge is entirely in tracking where each limb attaches. Chenille yarn adds its own texture lesson — it hides stitch definition, so tension matters more than it looks like it should. By the time you close the last round and set the safety eyes, you've practiced continuous rounds, inline shaping, and a bit of embroidery, all in one small project.
Common mistakes
- Losing the round marker This body is worked in a continuous spiral with no joins, so it's easy to drift off the start point. Move a stitch marker up every round without exception.
- Attaching a leg or claw crooked Working limbs inline during Round 9 means a twist there stays permanently. Check each attachment lies flat against the body before continuing past it.
- Stuffing too late The pattern calls for stuffing during Round 9, before the closing rounds shrink the opening. Waiting until after Round 12 makes it nearly impossible to pack firmly.
- Loose tension in chenille yarn Velour and chenille hide gaps less than they should, given the bulk. Keep stitches snug so stuffing doesn't peek through between them.
- Eyes placed before checking spacing Safety eyes are permanent once the washer locks on the inside. Hold them against the body and compare placement before pushing them through.


Intermediate
Progress Tracker
0 of 0 rounds
Tap a round to tick it off — your place is saved on this device.
The kit
- Yarn (Main Color): Himalaya Dolphin Baby or LaVita Velur, approx. 1/4 skein — super bulky chenille/velour weight (CYCA 6 — Super Bulky), red or color of choice
- Yarn (Accent): Small amount of black fingering-weight yarn (such as YarnArt Jeans) for embroidering the mouth
Hook
- E-4 (3.5 mm) or G-6 (4.0 mm)
Safety eyes
- 8 mm — 2 total
Stuffing
- Polyfill fiberfill
- Stitch marker
- Yarn needle / tapestry needle
- Scissors
Body
Round 16 sc in MR. (6)
Round 2Inc in each st around. (12)
Round 3[Sc, inc] repeat 6 times. (18)
Round 4[2 sc, inc] repeat 6 times. (24)
Round 5[3 sc, inc] repeat 6 times. (30)
Round 6Sc in each st around. (30)
Round 7Sc in each st around. (30)
Round 8Sc in BLO in each st around. (30)Insert safety eyes between Rnds 5 and 6, placing 3 sts between them. Secure washers on the inside.
Rnd 9 — Body with Claws and Legs Attached
Work this round continuously, attaching each claw and leg at the designated points by working across their chain bases as if they are part of the main body round:
Round 93 sc, dec, 1 sc, attach Claw 1, 2 sc, dec, attach Leg 1, 2 sc, attach Leg 2, 1 sc, dec, attach Leg 3, 3 sc, dec, attach Leg 4, 2 sc, attach Leg 5, 1 sc, dec, attach Leg 6, 3 sc, attach Claw 2, dec. (24)Stuff the body firmly at this stage before proceeding to the closing rounds.
Closing Rounds
Round 10[2 sc, dec] repeat 6 times. (18)
Round 11[Sc, dec] repeat 6 times. (12)
Round 12Dec 6 times. (6)Fasten off, leaving a long tail. Thread the tail through the front loops of the remaining 6 stitches, pull tight to close the opening completely, and weave the end through to the inside of the body.
Claws (Make 2 — worked inline during Rnd 9)
For each claw: Ch 9. Starting in the 2nd ch from hook, work 3 sc. Ch 3; starting in the 2nd ch from hook, work 2 sc (this forms the claw tip). Continue back along the main foundation chain: 5 sc.
Set each claw aside — do not fasten off. You will attach them directly into Rnd 9.
Legs (Make 6 — worked inline during Rnd 9)
For each leg: Ch 6. Starting in the 2nd ch from hook, work 5 sc.
Set each leg aside — do not fasten off. You will attach them directly into Rnd 9.
Assembly
Step 1Confirm both safety eyes are securely fastened with their washers on the interior of the body.
Step 2Using the black fingering-weight yarn and a yarn needle, embroider a small smile onto the front of the body, centered below the eyes. A simple curved running stitch works well here.
Step 3Weave in all remaining yarn ends through the inside of the body, burying them in the fiberfill to secure them.
Step 4Give your crab a gentle squeeze to even out the stuffing distribution.
Finishing
- Stuff the body firmly during Round 9, before the closing rounds start narrowing the opening.
- Work the three closing rounds, then thread the tail through the last stitches and pull the opening shut.
- Set both safety eyes, embroider the mouth, and weave every loose end into the fiberfill.
Why it works
The body increases by six stitches every round from Round 1 through Round 5, which is what pushes it from a flat disc into a dome.
Round 9 works the claws and legs inline, treating each limb's base chain as if it were a stitch in the body round, so nothing gets sewn on after the fact.
The closing rounds mirror the opening ones in reverse — decreasing by six stitches per round — which pulls the sphere shut symmetrically.
What it becomes
- A desk companion for anyone who collects small amigurumi animals rather than large stuffed toys.
- A quick gift for a child's shelf, paired with other small sea-themed makes.
- A photography prop for craft-fair displays, sitting well next to other single-skein projects.
Original pattern: https://amigurumicorner.com/tiny-crochet-crab-amigurumi/
FAQ
Why does the pattern say not to join rounds?
The body is worked in a continuous spiral, not joined rounds, which avoids a visible seam line. A stitch marker is essential here since there's no join to mark the round's start.
What happens if I attach a leg in the wrong spot on Round 9?
Since the round is worked continuously with each limb built into the stitch sequence, an early or late attachment shifts everything after it. It's worth counting stitches carefully before each attachment point.
When exactly should I stuff the body?
Stuff firmly during Round 9, right after the claws and legs are attached and before the closing rounds begin. Waiting until the opening narrows in the later rounds makes even stuffing much harder.