
Free Pattern
Step-by-Step
Crochet
Ponchos & WrapsTurtleneck poncho with a granny stitch body
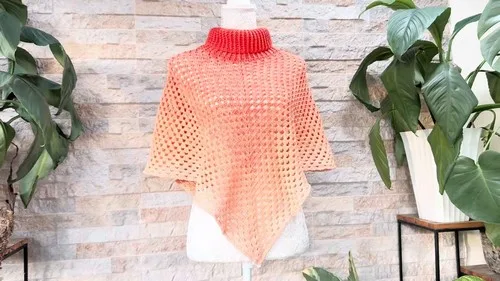
A ribbed turtleneck collar meets a granny stitch poncho body, finished with a slip stitch border.
- Level
- Intermediate
- Time
- 4-6 hours
- Hook
- 4 mm
- Yarn
- Worsted
Pattern highlights
- Chain a foundation multiple of six and work half double crochet into the back bumps to start the collar.
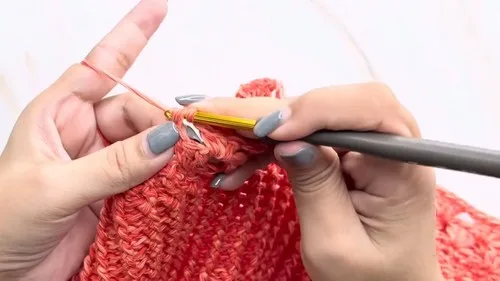
- Build the ribbing upward with alternating front post and back post double crochet stitches.
- Begin the granny stitch pattern at the top of the collar and repeat it round after round.
- Divide the stitches evenly into two halves so both sides of the poncho match at the corners.
- Work the last granny stitch round, then finish with a slip stitch and chain border all the way around.
- Weave in the yarn ends from both cakes to finish the poncho.
About This Pattern
A piece like this sits between my flat granny square throws and my more tailored garment patterns. It borrows a real neckline instead of a simple edge, so it reads as clothing, not a blanket with armholes. I file it under the ponchos that ask a little more of you but pay you back in fit. It is the kind of project that upgrades a whole drawer of plain sweaters.
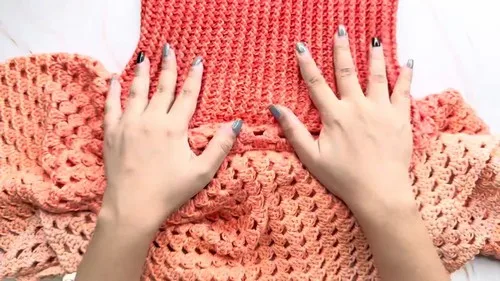
The collar leans on front post and back post double crochet worked in the round, which is what gives it that ribbed, turtleneck stretch. Partway through, the hook size changes from 4mm to 4.5mm, loosening the fabric before the body begins. From there the granny stitch pattern takes over, worked in sets of three double crochets split evenly across two halves. A slip stitch and chain border closes the whole thing off.
What comes off the hook is a poncho with a snug, ribbed neck and a soft, open granny stitch drape below it. The two cakes of Peach Perfect yarn keep the color consistent from collar to hem. It sits somewhere between a cowl and a wrap, which is exactly the gap I wanted it to fill.
Worth knowing
I like a pattern that makes you use two different skills and expects you to notice the seam between them. The ribbing here is real ribbing, alternating front post and back post stitches until it actually behaves like a turtleneck. Then the hook swap to 4.5mm loosens things up right when the granny stitch clusters take over, and the fabric changes hand under your fingers. Dividing the stitches into two matching halves keeps the corners honest, which is oddly satisfying to check as you go. The slip stitch and chain border is a quiet, tidy way to end a piece that has been doing quite a lot of work. It rewards patience without asking for anything exotic.
Common mistakes
- Missing the back bumps on the foundation chain Turn the chain over before Round 1 so you can see the back bumps clearly, then work into them one at a time.
- Losing the front post and back post rhythm Use a stitch marker at the start of each round until the alternating pattern feels automatic.
- Uneven stitch counts between the two halves Count the total stitches before dividing so each half gets the same number of sets of three double crochets.
- A border that pulls the edge in Keep the slip stitch and chain tension relaxed, or move up a hook size for just that round.

Intermediate
Progress Tracker
0 of 0 rounds
Tap a round to tick it off — your place is saved on this device.
The kit
- Two cakes of Peach Perfect yarn (approximately 400g total)
- 4mm and 4.5mm crochet hooks
- Yarn needle
- Scissors
- Stitch markers
- Measuring tape
Collar
Aim for the collar to be approximately 17cm tall.
Foundation Chain: Chain a multiple of 6 stitches based on your measurements for the collar.
Round 1Half double crochet into the back bumps of the foundation chain to create a ribbing effect.
Rounds 2–15Continue with the ribbing pattern using alternating front post double crochets and back post double crochets. Change to a 4.5mm crochet hook after 10cm.
Rounds 16–25Continue the ribbing pattern with the bigger hook.
Granny Stitch Pattern
Each half of the Poncho should have a multiple of 3 stitches. Divide the total number of stitches by 2.
Continue repeating the granny stitch pattern until you reach your desired Poncho size. Make sure both sides have the same number of sets of three double crochets between the corners.
Round 1Start with the granny stitch pattern at the top of the collar. Each round should follow the same pattern.
Border
Last Round: Finish the last round of the granny stitch pattern.
Border RoundStart the border by slip stitching and chaining one into each stitch around the Poncho.
Assembly
Step 1Secure the yarn ends to finish the Poncho.
Step 2Secure the ends of the yarn by weaving them back into the Poncho.
From the collection
Finishing
- Weave in the ends left over from the ribbed collar and the hook change.
- Weave in the ends from the granny stitch body and the slip stitch border.
- Lay the poncho flat and check the collar height and overall size against your measuring tape.
Why it works
The collar is worked in rounds using front post and back post stitches, which is what builds the ribbed texture rather than a flat panel.
The hook size increases from 4mm to 4.5mm partway through the collar, easing the tension before the granny stitch body begins.
The granny stitch body is split into two equal halves so the sets of three double crochets line up at both corners of the poncho.
What it becomes
- Wear it over a sleeveless dress as a layering piece for a cool evening out.
- Throw it on over a plain top when jeans and a poncho are all the outfit needs.
- Use it as a travel wrap that doubles as a scarf when the turtleneck collar is pulled up.
Original pattern: https://crocheteverything.com/warm-stylish-crochet-turtleneck-poncho-pattern-with-granny-stitch/
FAQ
Can I make the poncho bigger than the sample?
Yes. Extend the foundation chain by a multiple of six and keep repeating the granny stitch pattern until you reach your size. Just keep both halves matching in sets of three double crochets.
Why does the collar use two different hook sizes?
The 4mm hook keeps the lower ribbing snug against the neck, and the 4.5mm hook loosens the fabric higher up. It's a simple way to shape the collar without changing stitches.
How tall should the collar end up?
The pattern aims for around 17cm, but you can adjust the round count to suit your own neck and preference.
How do I keep the two sides of the poncho symmetrical?
Divide your total stitch count evenly before starting the granny stitch pattern. Check that both sides have the same number of three-double-crochet sets between the corners as you go.