Free Pattern
Step-by-Step
Crochet
Bags & PouchesTwo-Color Checkerboard Crochet Makeup Bag Pattern
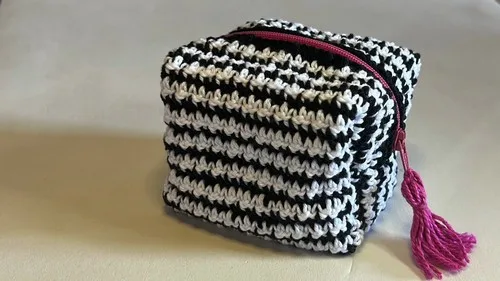
A checkerboard-stitch crochet makeup bag with a zipper, worked flat in black and white cotton.
- Level
- Intermediate
- Time
- 4-6 hours
- Hook
- 2 mm
- Yarn
- Fingering
Pattern highlights
- Start with a foundation chain sized just shorter than your zipper, using an odd stitch count.
- Begin round 7 with a standing single crochet into the eighth stitch of the previous row.
- Work rows 21 through 32 with a chain-9 gap, then single crochet into the second chain.
- Repeat the row 7 standing-stitch setup through rows 33 to 46 to finish the panel.
- Weave in ends, sew in the zipper, then seam the sides and remaining edges together.
About This Pattern
I keep a shelf for small zippered things, and this bag earns its spot there. It is not a showpiece. It is a working pouch, sized to a zipper rather than a whim. The alternating black and white stitches do the visual work, so the shape can stay simple and practical.
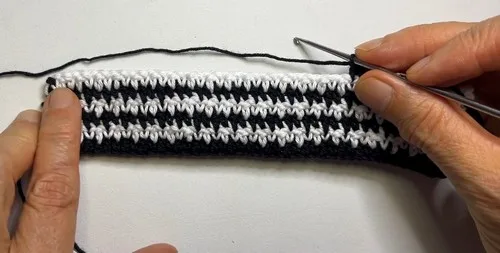
The technique here is a two-color checkerboard, built from single and double crochet swapped every row. A standing stitch resets the pattern partway through, and a chain-9 gap breaks the fabric later on. Both moments ask for attention, not skill you do not already have.
What comes off the hook is a flat panel, seamed into a lined little bag. Cotton yarn in black and white gives it structure and a crisp graphic look. A third color is optional, mostly for anyone who wants the checkerboard to have a third voice.
Common mistakes
- Wrong foundation chain count Count your starting chain twice and confirm it is odd. An even count will misalign the alternating sc and dc pattern from row one.
- Sewing the zipper closed Sew the zipper in while it is open, not closed. A closed zipper pulls the seam tight and makes the bag hard to open once finished.
- Miscounting the chain-9 gap Count all nine chain stitches before working into the second one. A short chain shrinks the gap and throws off the row's stitch placement.
- Sewing before weaving in tails Weave in all tails first, then seam. Tails caught inside a seam are nearly impossible to fix once the bag is closed up.

Intermediate
Progress Tracker
0 of 0 rounds
Tap a round to tick it off — your place is saved on this device.
The kit
- 100% cotton yarn in black and white
- Optional third color
- 2 mm crochet hook
- Scissors
- Tapestry needle
- Zipper
- Pins
Main Pattern
Rows 1–6Alternate 1 single crochet (sc) and 1 double crochet (dc) across the row, ending with 1 dc. Switch colors every row.
Round 7Make 1 standing sc into the 8th stitch (into the double crochet of the previous row) and continue the pattern.
Rows 8–20Switch colors and work 13 more rows (14 in total, including the 7th row).
Rows 21–32Complete the dc and chain 9. Then, work 1 sc into the second chain stitch, followed by 1 dc. Continue the pattern, switching colors as you go.
Rows 33–46Repeat row 7.
Rows 47–52Repeat the first 6 rows.
Foundation
Start with a slip knot and create a foundation chain with an odd number of stitches.
The chain length should be slightly shorter than your zipper, considering it will stretch.
Assembly
Step 1Weave in all yarn tails.
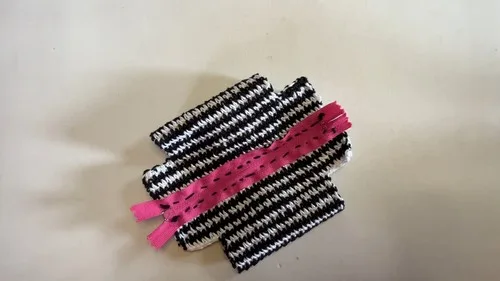
Step 2Sew the zipper onto the right side of your crochet piece. Ensure both parts are aligned.
Step 3Sew the two sides of the bag together, remembering to open the zipper while sewing.
Step 4Sew the remaining parts together.
Step 5Turn the bag inside out and arrange the corners.
Step 6Optional: Add embellishments to the zipper edge, such as beads or a tassel.
From the collection
Finishing
- Weave in every yarn tail before you sew anything, so the panel edges stay clean.
- Pin and sew the zipper to the right side of the piece, keeping both edges aligned.
- Sew the side seams with the zipper open, then join the remaining edges and turn right side out.
Why it works
An odd number of foundation stitches keeps the single-and-double alternation landing evenly across every row.
The chain-9 gap worked in rows 21 to 32 interrupts the checkerboard, likely marking a closure point.
The piece is worked flat in rows, not joined in the round, so it can be seamed into a bag afterward.
What it becomes
- A dedicated makeup pouch that pairs well with a matching cosmetics tray or vanity organizer.
- A travel toiletry bag, sized to slip into a larger duffel alongside a fabric wash bag.
- A small gift alongside skincare or nail products, given to a friend who likes handmade things.
Original pattern: https://crocheteverything.com/trendy-stylish-functional-crochet-makeup-bag-with-a-zipper-pattern/
FAQ
Do I need a third color?
No, the third color is listed as optional. The bag works fully in just black and white cotton yarn.
What size zipper should I buy?
Measure your zipper first, then chain slightly shorter than that length. The pattern notes the crochet fabric will stretch a bit once worked.
Is the standing stitch hard to learn?
It is a small technique, not a hard one. You are simply starting a new stitch without a slip stitch or chain first, right into the eighth stitch.